Creating a .STL File: Difference between revisions
From 1511Wookiee
Jump to navigationJump to search
Programming (talk | contribs) No edit summary |
Programming (talk | contribs) No edit summary |
||
| Line 4: | Line 4: | ||
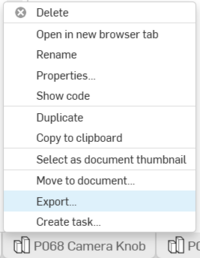
#<p style="margin-top: 40px;">Right-click on the tab for the Part Studio part and select "Export".</p> | #<p style="margin-top: 40px;">Right-click on the tab for the Part Studio part and select "Export".</p> | ||
#<p>In the dialog box that appears:</p> | #<p>In the dialog box that appears:</p> | ||
##< | ##<span>Make sure the 'File name' matches the part name.</br></span><p style="margin-top: 0px;">NOTE: if you have had this part 3D printed before, then add a version to the file name. For example, if this is the second time then add ' v2' to the end of the file name.</p> | ||
##<p>Set Format to " | ##<p>Set 'Format' to "STL".</p> | ||
##<p>Set | ##<p>Do NOT check 'Export models oriented Y axis up</p> | ||
##<p>Set | ##<p>Set 'STL Format' to "Binary".</p> | ||
##<p>Set | ##<p>Set 'Units' to "Millimeter".</p> | ||
##<p> | ##<p>Set 'Resolution' to "Fine".</p> | ||
<p | ##<p>Set 'Options' to "Download".</p> | ||
##<p>There should be no need to check 'Export unique parts...' because you should have only one part in the drawing.</p> | |||
##<p>You should not need to check 'Include hidden instances...' because you should only have one part in the drawing.</br>[[image:img1737992851262.png|400px]]</p> | |||
Revision as of 13:55, 26 January 2025
TBD
Right-click on the tab for the Part Studio part and select "Export".

Right-click on the tab for the Part Studio part and select "Export".
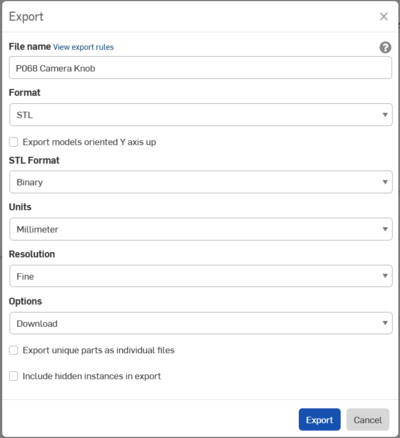
In the dialog box that appears:
- Make sure the 'File name' matches the part name.
NOTE: if you have had this part 3D printed before, then add a version to the file name. For example, if this is the second time then add ' v2' to the end of the file name.
Set 'Format' to "STL".
Do NOT check 'Export models oriented Y axis up
Set 'STL Format' to "Binary".
Set 'Units' to "Millimeter".
Set 'Resolution' to "Fine".
Set 'Options' to "Download".
There should be no need to check 'Export unique parts...' because you should have only one part in the drawing.
You should not need to check 'Include hidden instances...' because you should only have one part in the drawing.

- Make sure the 'File name' matches the part name.