Creating a .STL File: Difference between revisions
Programming (talk | contribs) No edit summary |
No edit summary |
||
| (6 intermediate revisions by 2 users not shown) | |||
| Line 1: | Line 1: | ||
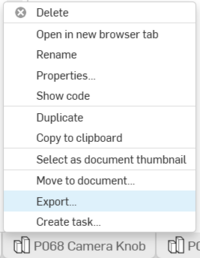
#<p style="margin-top: 40px;">Right-click on the tab for the Part Studio part and select "Export".</br>[[image:img1737964550651.png|200px]]</p> | |||
#<p style="margin-top: 40px;">Right-click on the tab for the Part Studio part and select "Export".<br>[[image:img1737964550651.png|200px]]</p> | |||
#<p style="margin-top: 40px;">In the dialog box that appears:</p> | #<p style="margin-top: 40px;">In the dialog box that appears:</p> | ||
##<span>Make sure the 'File name' matches the part name.<br></span><p style="margin-top: 0px;">NOTE: if you have had this part 3D printed before, then add a version to the file name. For example, if this is the second time then add ' v2' to the end of the file name.</p> | ##<span>Make sure the 'File name' matches the part name.</br></span><p style="margin-top: 0px;">NOTE: if you have had this part 3D printed before, then add a version to the file name. For example, if this is the second time then add ' v2' to the end of the file name.</p> | ||
##<p>Set 'Format' to "STL".</p> | ##<p>Set 'Format' to "STL".</p> | ||
##<p>Do NOT check 'Export models oriented Y axis up</p> | ##<p>Do NOT check 'Export models oriented Y axis up</p> | ||
| Line 11: | Line 9: | ||
##<p>Set 'Options' to "Download".</p> | ##<p>Set 'Options' to "Download".</p> | ||
##<p>There should be no need to check 'Export unique parts...' because you should have only one part in the drawing.</p> | ##<p>There should be no need to check 'Export unique parts...' because you should have only one part in the drawing.</p> | ||
##<p>You should not need to check 'Include hidden instances...' because you should only have one part in the drawing.<br>[[image:img1737992851262.png|400px]]</p> | ##<p>You should not need to check 'Include hidden instances...' because you should only have one part in the drawing.</br>[[image:img1737992851262.png|400px]]</p> | ||
#<p style="margin-top: | #<p style="margin-top: 25px">Click 'Export'</br><span style="margin-left: 25px">NOTE: The file will be saved into your Downloads folder (e.g. C:\Users\''username''\Downloads)</span></p> | ||
#<p style="margin-top: 40px;">Copy the .STL file to Teams</p> | |||
#*Go to 'Robot Design' channel | |||
#*Go to 'Files' tab | |||
#*Go to the build season specific year folder (e.g. 2024-2025) | |||
#*Go to 'Build Season' folder | |||
#*Go to '3D Printing' folder | |||
#*Go to 'To Be Printed' folder | |||
#*Select your file in Windows File Explorer and drag it into 'To Be Printed' folder | |||
#<p style="margin-top: 40px;">Update the '3D Printed Parts Requests' spreadsheet</p> | |||
#*Go to 'Robot Design' channel | |||
#*Go to 'Files' tab | |||
#*Go to the build season specific year folder (e.g. 2024-2025) | |||
#*Go to 'Build Season' folder | |||
#*Go to '3D Printing' folder | |||
#*Open the '3D Printed Parts Requests.xlsx' file | |||
#*Edit a row at the top of the spreadsheet (around row 5) | |||
#*Fill in columns A thru K ('File Name' thru 'Other Notes'), do not enter anything in the other columns | |||
#*In the 'Other Notes' column, indicate your preferred color | |||
#<p style="margin-top: 40px;">Inform Mr. Weisbrod (for 2025) that you uploaded the .STL file and updated the spreadsheet</p> | |||
Latest revision as of 17:23, 28 January 2025
Right-click on the tab for the Part Studio part and select "Export".
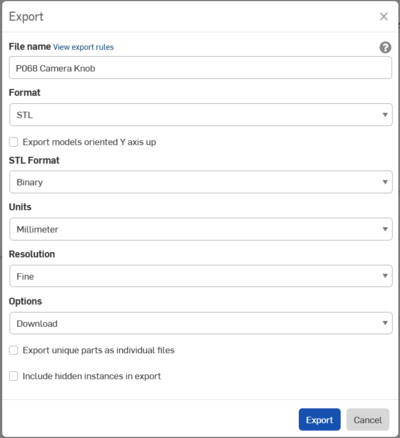
In the dialog box that appears:
- Make sure the 'File name' matches the part name.
NOTE: if you have had this part 3D printed before, then add a version to the file name. For example, if this is the second time then add ' v2' to the end of the file name.
Set 'Format' to "STL".
Do NOT check 'Export models oriented Y axis up
Set 'STL Format' to "Binary".
Set 'Units' to "Millimeter".
Set 'Resolution' to "Fine".
Set 'Options' to "Download".
There should be no need to check 'Export unique parts...' because you should have only one part in the drawing.
You should not need to check 'Include hidden instances...' because you should only have one part in the drawing.
- Make sure the 'File name' matches the part name.
Click 'Export'
NOTE: The file will be saved into your Downloads folder (e.g. C:\Users\username\Downloads)Copy the .STL file to Teams
- Go to 'Robot Design' channel
- Go to 'Files' tab
- Go to the build season specific year folder (e.g. 2024-2025)
- Go to 'Build Season' folder
- Go to '3D Printing' folder
- Go to 'To Be Printed' folder
- Select your file in Windows File Explorer and drag it into 'To Be Printed' folder
Update the '3D Printed Parts Requests' spreadsheet
- Go to 'Robot Design' channel
- Go to 'Files' tab
- Go to the build season specific year folder (e.g. 2024-2025)
- Go to 'Build Season' folder
- Go to '3D Printing' folder
- Open the '3D Printed Parts Requests.xlsx' file
- Edit a row at the top of the spreadsheet (around row 5)
- Fill in columns A thru K ('File Name' thru 'Other Notes'), do not enter anything in the other columns
- In the 'Other Notes' column, indicate your preferred color
Inform Mr. Weisbrod (for 2025) that you uploaded the .STL file and updated the spreadsheet

