2016:Lifter: Difference between revisions
No edit summary |
|||
| Line 8: | Line 8: | ||
<span style="font-size:larger">Two 775pro motors</span> | <span style="font-size:larger">Two 775pro motors</span> | ||
XXX: Need breakering information here | |||
<span style="font-size:larger">versaplanetary 50:1 with two motor adaptor</span> | <span style="font-size:larger">versaplanetary 50:1 with two motor adaptor</span> | ||
| Line 19: | Line 21: | ||
'''<span style="font-size:larger">Sensors:</span>''' | '''<span style="font-size:larger">Sensors:</span>''' | ||
<span style="font-size:larger">One Retroreflective sensor (EE-SPY415) to determine when the scaler is at its high end stop.</span> | <span style="font-size:larger">One Retroreflective sensor (Omron EE-SPY415) to determine when the scaler is at its high end stop.</span> | ||
<span style="font-size:larger">One Optical Flag sensor (OPB815WZ) to determine when the scaler is at its low end stop and home for encoder. </span> | <span style="font-size:larger">One Optical Flag sensor (OPB815WZ) to determine when the scaler is at its low end stop and home for encoder. </span> | ||
| Line 39: | Line 41: | ||
'''<font size="4"><span style="line-height: 28.7999992370605px"><span style="font-size:large"><span style="font-size:small"><span style="font-size:medium">Sensors:</span></span></span></span></font>''' | '''<font size="4"><span style="line-height: 28.7999992370605px"><span style="font-size:large"><span style="font-size:small"><span style="font-size:medium">Sensors:</span></span></span></span></font>''' | ||
<font size="4"><span style="line-height: 28.7999992370605px"><span style="font-size:large"><span style="font-size:small"><span style="font-size:medium">Two </span></span></span></span></font><span style="font-size: 15.6000003814697px; line-height: 24.9600009918213px">Optical Flag sensor (OPB815WZ) to determine when the arm is at an end stop | <font size="4"><span style="line-height: 28.7999992370605px"><span style="font-size:large"><span style="font-size:small"><span style="font-size:medium">Two </span></span></span></span></font><span style="font-size: 15.6000003814697px; line-height: 24.9600009918213px">Optical Flag sensor (OPB815WZ) to determine when the arm is at an end stop -- NOTE: due to switch to potentiometer for absolute positioning, these may be removed!</span> | ||
<span style="font-family: arial, helvetica, sans-serif; font-size: 15.6000003814697px; line-height: 24.9600009918213px">One </span><span style="font-family:arial,helvetica,sans-serif"><span style="font-size:larger">potentiometer to determin where the arm of the scaler is. </span></span> | <span style="font-family: arial, helvetica, sans-serif; font-size: 15.6000003814697px; line-height: 24.9600009918213px">One </span><span style="font-family:arial,helvetica,sans-serif"><span style="font-size:larger">potentiometer to determin where the arm of the scaler is. </span></span> | ||
Revision as of 11:00, 1 February 2016
1. The Plan
We have come to the conclusion that the best method of scaling the castle near the end of the match is using a telescoping arm to latch onto the bar and then lift with the arm.
2. Motors and Sensors
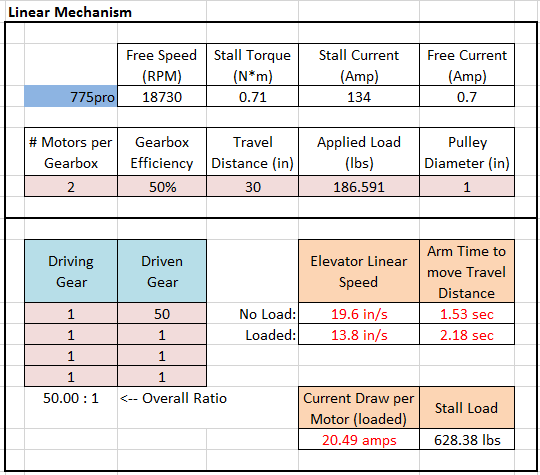
Scaler arm extend:
Two 775pro motors
XXX: Need breakering information here
versaplanetary 50:1 with two motor adaptor
12 tooth on motor shaft to 12 tooth on mechanism.
Sensors:
One Retroreflective sensor (Omron EE-SPY415) to determine when the scaler is at its high end stop.
One Optical Flag sensor (OPB815WZ) to determine when the scaler is at its low end stop and home for encoder.
One Shaft Encoder (GrayHill 61KS256) for use to measure scaler extension location.
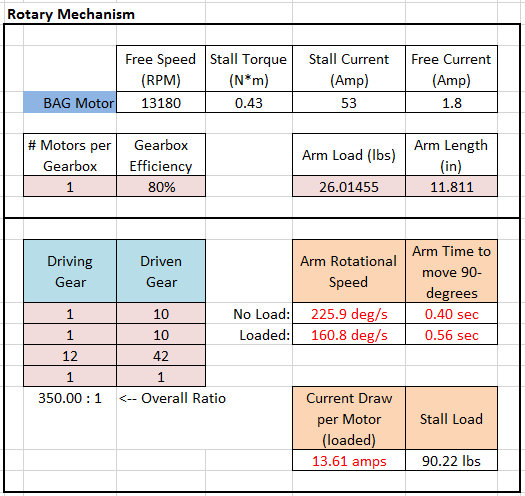
Scaler Pivot Arm:
Use Versaplanetary 100:1
12 tooth sprocket on motor shaft driving a 42 tooth sprocket
Sensors:
Two Optical Flag sensor (OPB815WZ) to determine when the arm is at an end stop -- NOTE: due to switch to potentiometer for absolute positioning, these may be removed!
One potentiometer to determin where the arm of the scaler is.
3. Update 1/26/16
3.1 What we're working on
- Design rollers/stops for the arm stages
- Design lightning holes
- Design motor mountings and figure out how to attach to the drivebase
- Send parts to chamtek
- Finish CAD work
3.2 Photos
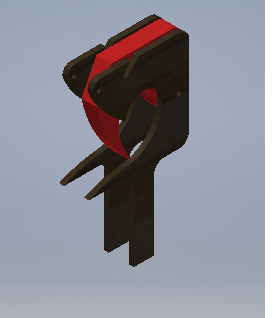
This is the hook we will be using.
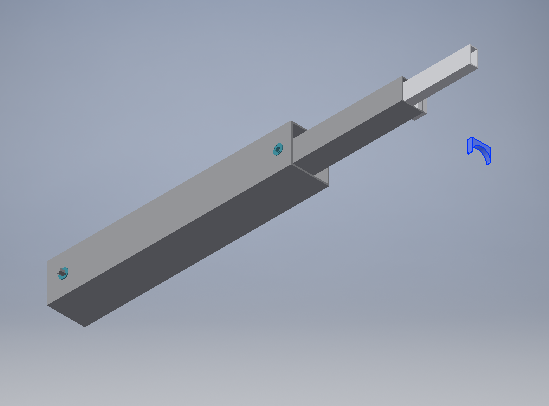
This is the actual arm we designed.


