2022:Shooter: Difference between revisions
Mechanical1 (talk | contribs) No edit summary Tag: visualeditor |
Mechanical1 (talk | contribs) No edit summary Tag: visualeditor |
||
| Line 68: | Line 68: | ||
== More Fabrication! 2/9/2022 == | == More Fabrication! 2/9/2022 == | ||
We did some CNC work today, getting settings dialed in with cutting Lexan. We finished the night with these settings for a .25" end mill bit with 2 flutes. 18000 RPM, 150 feed, .0625 cut depth with 4 passes. We hope to get things more dialed in tomorrow, as we made good progress today. | We did some CNC work today, getting settings dialed in with cutting Lexan. We finished the night with these settings for a .25" end mill bit with 2 flutes. 18000 RPM, 150 feed, .0625 cut depth with 4 passes. We hope to get things more dialed in tomorrow, as we made good progress today. | ||
== Harris Parts Came in! 2/11/2022 == | |||
We finally got our shooter side plates from Harris! They look awesome, and we are so excited to paint them! We did a test fit, and everything sat all right on the robot. We also got the Hood Side Plates CNC'd, | |||
Revision as of 20:44, 11 February 2022
Leaders: Nick V. and Kadence O.
Prototyping - 1/9/2022 - 1/12/2022
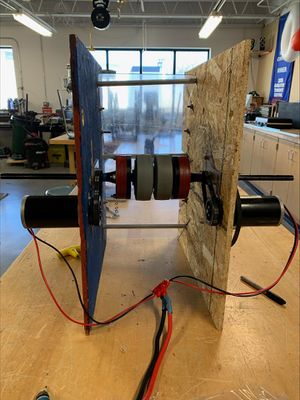
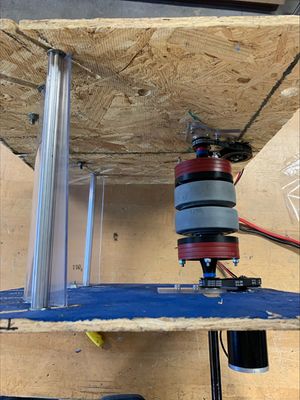
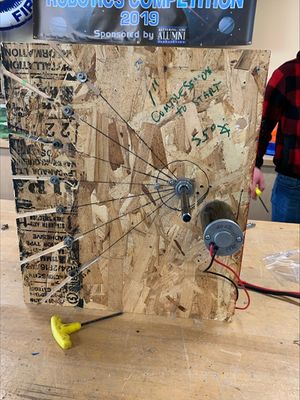
We started prototyping how we were going to outtake the Cargo the day after Kickoff. We talked about multiple ways that we could go about it, and decided to begin prototyping a shooter. This shooter would be very similar to our 2020-21 shooter, but scaled up for the diameter of the Cargo. In order to do this, we had to scale up the whole assembly. We made new side plates with even more grooves to increase the amount of contact the Cargo would have on the Lexan "hood" as it traveled around our flywheel. The flywheel is made up of two 4 inch Colson wheels, that are 1 1/2 inches wide and they sit between two flywheels? on a 1/2 inch hex shaft. We originally spun the axle with a drill and fed the balls in by hand to the flywheel, but we might use a CIM motor to drive it for testing purposes.
Prototyping 1/13/2022
We got all of the pins set up for the shooter and did lots of testing. We adjusted the location of the pins to allow for the most contact when it spins along the flywheel. We have also decided that there was a major compression point in the middle of the ball's travel so we moved the pins out to relieve some of that tensions. We found that after that major sticking point was removed, we were able to get more distance on the Cargo. We set up a test with 2 garbage cans (about 3 feet tall) on top of a table (2 1/4 feet tall) with a total of a little over 8 feet. We also set it 17 feet away from the shooter, which is the distance from launchpad to the Hub. After making these changes, we were able to get the distance but not the height. We plan to add a second CIM motor to increase the velocity and hopefully we will get the height we are looking for. We have everything else dialed in to our knowledge, so we think it's isolated to a power issue and one CIM not having the power we need to get the Cargo high enough.
Prototyping 1/15/2022
Today we made big progress in terms of getting distance and height. We went from one CIM motor to two CIMs and we got much more power and velocity. We tried to put 2 CIMS on one axle but the gearbox we wanted to use had a gear reduction from about ~6000 rpm down to 3000. To fix our issue, we had a pulley on each side driven by a CIM. This was much better and allowed us to make 25 foot shots into our Upper Hub mockup. We took the estimated height of the shooter and subtracted it from the height of our makeshift hub to make sure our test was accurate. We found this height to be 7' 11" since the robot is 10 1/2" off the ground from the center of the axle. We found that the Lexan panel for our hood got a lot of flex while shooting so we plan to add supports behind it. We also want to add more grip on the Lexan so we will use black rubber tape so then the friction the ball receives when firing is more consistent. Now with shooter in a more solidified state, we believe that we will most likely be loading from straight up, which means we have to play with the degrees of contact we get while shooting to make sure we can still make a launchpad shot, still aligning with the Strategy Mind Map.
Prototyping 1/16/2022
We supported our Lexan with more churro tubes, and we got less flex. We tried Gaff tape on the back of the hood and it introduced more friction and in turn, more spin which sent our Cargo off target. We shortened the Lexan from 24" to 20". This allowed us to adjust the angle to a more straight loading design which will be more accurate to what it is going to be on the robot. We also adjusted the amount of compression, making the pins go 10 1/32" from the outside of the axle to the center of the screws and 10 1/2" from the outside of the axle to the center of the churro tube. We will most likely keep the Lexan hood the way it is, with no extra material. We also kept track of the spread of our shots to measure accuracy. We found that the spread was about 3' 7" wide and 1' 6" deep. This is important because both dimensions are less than the Upper Hub diameter of 4 feet. Below are some pictures of the shooter in its current state.
CAD 1/17/2022
After we got most of the data and analysis from our prototype, it was time to move on to the basic CAD to figure out robot real estate and conflicts before we got into the nitty-gritty. We started by scaling up our 2020-21 shooter to the correct dimensions for the Cargo. We then added motors and other auxiliary components to help with our sense of scale. We also calculated trajectories and motor speed and power needed to accomplish the shots outlined in the Mind Map. We plan to continue with our basic CAD and then move into the actual designing and testing phase.
CAD 1/19/2022
After a team integration to get everyone on the same page, cargo joined as a group to assemble our prototypes in CAD in order to figure out how to retract intake and what angle storage/shooter will be in order to maximize space efficiency. We each made separate assemblies for each mechanism and then placed them in a drive base assembly. Once the intake, storage, and shooter were all in one assembly, we were able to properly constrain and align the mechanisms to what we believe is the most beneficial positions. By placing the storage 48.82 degrees from the top of the drive base and by setting the intake pivot point to the top of the storage, we were able to retract the intake into the frame perimeter. Tomorrow, we will try to assemble this complete cargo pathway using the tools in our shop and see if all of our dimensions are still accurate.
CAD 1/20/2022
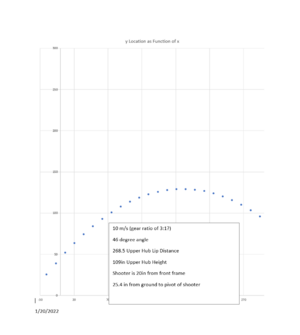
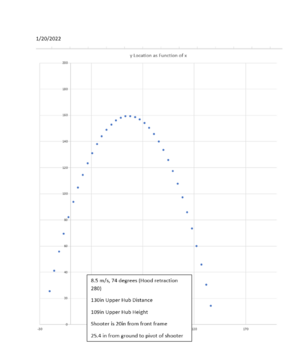
After double-checking our dimensions on our rough mock-up in CAD, we began to modify our original prototype to be more accurate to the CAD. That was more of a Storage and Intake thing, Shooter hasn't been incorporated into it yet. While that was happening, we did shooter trajectory calculations to make sure our motors and gearing would be up to the task for the Tarmac and Alliance Wall shots into the upper hub. Luckily, we were able to make both shots and the RPM and power matched up. Here are the two trajectories for the Tarmac and Alliance Wall. We plan to continue testing our mock-up on a real prototype on Saturday before we move to a more final design stage.
CAD Weekend! 1/22/2022
Today we made many big discoveries. We first found out that with the shifts in position of storage and intake, we would not get the amount of contact we need in order to make an Alliance Wall shot. So it was great that our calculations said we could do it, but we didn't have the space allowance to fit within the frame perimeter. We took this in account when we started the final design, and our goal is to have a mostly finished design by tomorrow. We are still figuring out sensor location and mounting, among other things. Overall, the CAD is going quite well and we should be able to finish. We still need to figure out whether we are driving the hood with a servo or something else, but based on the number of slots on the PD board, we may not have another choice, so hopefully a servo will do the job.
CAD Weekend!! 1/23/2022
Today the shooter assembly came more together but we did a double check with the original spacing sketch and turns out our dimensions were wrong! This means that there is going to have to be some major adjustments to our sideplate and all of the other corresponding pieces. It's a minor setback, but it means our shooter and storage transition will be better!
And... More CAD 1/25/2022
We continued the detailed design of the Shooter. We worked with Storage to potentially integrate further which requires moving our pre-shooter wheel in. We need to finish that adjustment in the CAD, as we continue to sort out how we can further connect to hang. Our goal is to have the hood complete by this weekend unless something changes. We still also need to figure out what servo we are using and the gearing to go along with it.
CAD! 1/26/2022
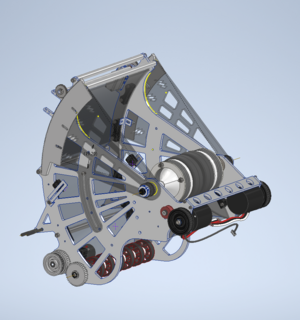
Today, we rolled up our sleeves and dove head first into our CAD model. After determining the geometry of the shooter during CAD weekend, we were all set to push onwards! Unfortunately, we discovered the other day that some of our storage measurements were slightly off, which manipulated the way that the ball passed into the storage, so we had to make those minor adjustments. We established the correct angle for the Lexan hood angle and then created a gear plate to allow for us to adjust this angle to shoot from various locations. We also coordinated with the rest of the cargo team to determine a location for the pre-shooter wheel in order to prepare the ball for launch and transition the cargo from storage to shooter. Finally, we put all of the pieces together in an assembly which we will use in our final robot assembly and will use to determine various factors; such as real estate, trajectory, and force body diagrams.
CAD?!? 1/27/2022
We continued with the shooter final assembly, dialing in the hood Gear Rack and the Hood Assembly. We have to make some slight changes to the Side Plate due to some conflicts with Storage. We need to cut it back about 4 inches and move our motor outward. Luckily, we did not have to move the pre-shooter wheel as of right now, but that may change as storage gets more dialed in. Come Saturday, our goal is to have the Assembly closer to finished or finished.
Almost done with CAD? 1/29/2022
We have made lots of changes to the shooter since the 27th. The fixed the conflict with Storage, moved the Flywheel motor outward, added holes for pneumatics mounting, got our pre-shooter wheel on, added a tensioner, and finalized pulley locations. Things are starting to really come together. All that's left is to work on sensor location, add another tensioner, and finalize the hood design. From there we will do lightening holes and a shop drawings. ADD PICTURE
CAD 1/30/2022
Today, we cleaned up our CAD assembly. We brought the side panel Lexan and the gear rack .125" inwards, in order to 1) make room for the second Lexan Panel as the original turns and 2) make room to mount the gear so we can get contact with the gear rack. By doing this however, we realized that the gear rack interfered with our quarter 20 screws, so we offset the holes upwards, away from the Lexan. We also worked with our programming Cargo lead in order to determine the mounting for all of the sensors. We fixed conflicts with the rest of the mechanisms and made our CAD more consistent.
THE SHOOTER IS DONE! 2/1/2022
After many changes and adjustments, the shooter is complete! The servo has a mount, it's all geared up, and all final holes and lightening holes have been added. The hood also got lightening holes, and we conducted a weight analysis of the new parts. Now all that is next is to have it reviewed and manufactured!
THE SHOOTER IS *ACTUALLY* DONE!! 2/2/2022
Today, we reviewed our shooter assembly one more time to verify that all of our dimensions and gears were correct. Upon closer inspection, we discovered that one of our lightening holes had caused instability in the upper portion of our aluminum side plate! We shifted the holes slightly down to thicken up the top strip. Then, we made the lightening holes more uniform to make the part look more visually enticing. Finally, we made a shop drawing of our side plate and sent it off to L3Harris!!!
Lime Light: We also worked on mounting for our lime light. We originally had it mounted to the top of the shooter, however this proved to be unreliable because of the vulnerability of this section (the top of the robot is often subjected to bouncing cargo or game elements). We began brainstorming other ways to mount it. Our original thought was to mount to the side of storage, however this took our lime light into dedicated hang space. Our next idea was to create a mount behind the shooter, but this proved to be too bulky. Then, we tried mounting it to the intake/storage bar, however we were worried that this might limit the lime lights vision. Finally, we thought to mount the lime light to the original location, on top of the shooter, but add brackets on either side that are taller than the lime light itself. The goal here is that if cargo does hit that area, the brackets will limit contact with the cargo and absorb some of the shock. We are still weighing the pros and cons of our options.
Adding Finishing Touches 2/5/2022
We added brackets for the beam break sensors, added other fasteners and spacers, and just general polish. We made sure things were set in the Final Robot, and we have began releasing more parts to get made in the shop. We are in a pretty good spot, all of the constraints are fixed in Final Robot too. Unfortunately, there must've been an issue back in the early stages of constraining the Drive Base to the ground plane because our shooter angle is wrong in reference to the ground plane. It should be 80 degrees, but because of the constraint error that we based mounting off of, our current angle is 72, which means we cannot do the shot backed up against the hub. We still will meet the tarmac and launchpad shots outlined in the mind map, but we cannot meet the nice to have of backing up against the hub. We might fix the side plate later down the road, but since we just sent it out to Harris, it's not the end of the world currently.
Completely Overhauled... 2/6/2022
We fixed the issue of our angle being wrong, we went from 72 and now we are back to 80. This means we had to make major changes to the Side Plate, Hood, and other infrastructure. We can know do both shots outlined in the Mind Map, and the hub shot. We then re-sent it out to Harris, and we hope to get it back next week. Due to the amount of material we had to remove, the side plates are now lighter, but don't look as good in my opinion. Either way, we were able to completely change the entire shooter in a day and fixed all angle issues.
Shop Drawings/Fabrication 2/8/2022
While we are waiting for our Harris parts, we were able to focus our attention on other, more time sensitive, team initiatives. Any work for the shooter today happened through shop drawings, which are mostly completed.
More Fabrication! 2/9/2022
We did some CNC work today, getting settings dialed in with cutting Lexan. We finished the night with these settings for a .25" end mill bit with 2 flutes. 18000 RPM, 150 feed, .0625 cut depth with 4 passes. We hope to get things more dialed in tomorrow, as we made good progress today.
Harris Parts Came in! 2/11/2022
We finally got our shooter side plates from Harris! They look awesome, and we are so excited to paint them! We did a test fit, and everything sat all right on the robot. We also got the Hood Side Plates CNC'd,
