2022:Shooter: Difference between revisions
Mechanical1 (talk | contribs) (Added info for 1/16) Tag: visualeditor |
Mechanical1 (talk | contribs) Tag: visualeditor |
||
| Line 14: | Line 14: | ||
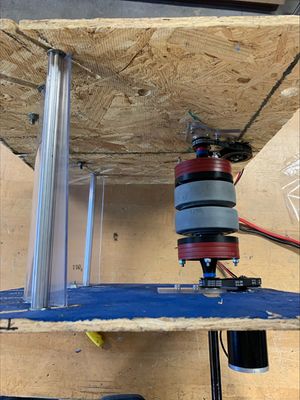
[[File:Thumbnail Image.jpg|thumb|Top down of the shooter. ]] | [[File:Thumbnail Image.jpg|thumb|Top down of the shooter. ]] | ||
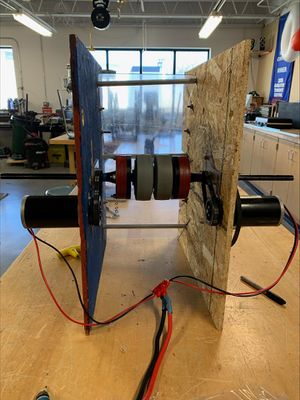
[[File:Thumbnail Image (1).jpg|thumb|Side view of the shooter. ]] | [[File:Thumbnail Image (1).jpg|thumb|Side view of the shooter. ]] | ||
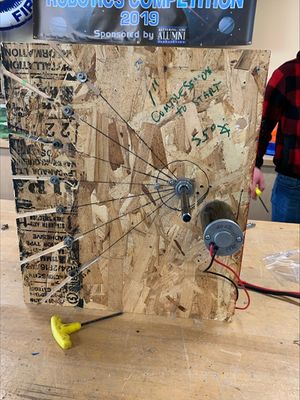
We supported our Lexan with more churro tubes, and we got less flex. We tried Gaff tape on the back of the hood and it introduced more friction and in turn, more spin which sent our Cargo off target. We shortened the Lexan from 24" to 20". This allowed us to adjust the angle to a more straight loading design which will be more accurate to what it is going to be on the robot. We also adjusted the amount of compression, making the pins go 10 1/32" from the outside of the axle to the center of the screws and 10 1/2" from the outside of the axle to the center of the churro tube. We will most likely keep the Lexan hood the way it is, with no extra material. Below are some pictures of the shooter in its current state. | We supported our Lexan with more churro tubes, and we got less flex. We tried Gaff tape on the back of the hood and it introduced more friction and in turn, more spin which sent our Cargo off target. We shortened the Lexan from 24" to 20". This allowed us to adjust the angle to a more straight loading design which will be more accurate to what it is going to be on the robot. We also adjusted the amount of compression, making the pins go 10 1/32" from the outside of the axle to the center of the screws and 10 1/2" from the outside of the axle to the center of the churro tube. We will most likely keep the Lexan hood the way it is, with no extra material. We also kept track of the spread of our shots to measure accuracy. We found that the spread was about 3' 7" wide and 1' 6" deep. This is important because both dimensions are less than the Upper Hub diameter of 4 feet. Below are some pictures of the shooter in its current state. | ||
== CAD 1/17/2022 == | |||
After we got most of the data and analysis from our prototype, it was time to move on to the basic CAD to figure out robot real estate and conflicts before we got into the nitty-gritty. We started by scaling up our 2020-21 shooter to the correct dimensions for the Cargo. We then added motors and other auxiliary components to help with our sense of scale. We also calculated trajectories and motor speed and power needed to accomplish the shots outlined in the Mind Map. We plan to continue with our basic CAD and then move into the actual designing and testing phase. | |||
Revision as of 18:35, 18 January 2022
Leaders: Nick V. and Kadence O.
Prototyping - 1/9/2022 - 1/12/2022
We started prototyping how we were going to outtake the Cargo the day after Kickoff. We talked about multiple ways that we could go about it, and decided to begin prototyping a shooter. This shooter would be very similar to our 2020-21 shooter, but scaled up for the diameter of the Cargo. In order to do this, we had to scale up the whole assembly. We made new side plates with even more grooves to increase the amount of contact the Cargo would have on the Lexan "hood" as it traveled around our flywheel. The flywheel is made up of two 4 inch Colson wheels, that are 1 1/2 inches wide and they sit between two flywheels? on a 1/2 inch hex shaft. We originally spun the axle with a drill and fed the balls in by hand to the flywheel, but we might use a CIM motor to drive it for testing purposes.
Prototyping 1/13/2022
We got all of the pins set up for the shooter and did lots of testing. We adjusted the location of the pins to allow for the most contact when it spins along the flywheel. We have also decided that there was a major compression point in the middle of the ball's travel so we moved the pins out to relieve some of that tensions. We found that after that major sticking point was removed, we were able to get more distance on the Cargo. We set up a test with 2 garbage cans (about 3 feet tall) on top of a table (2 1/4 feet tall) with a total of a little over 8 feet. We also set it 17 feet away from the shooter, which is the distance from launchpad to the Hub. After making these changes, we were able to get the distance but not the height. We plan to add a second CIM motor to increase the velocity and hopefully we will get the height we are looking for. We have everything else dialed in to our knowledge, so we think it's isolated to a power issue and one CIM not having the power we need to get the Cargo high enough.
Prototyping 1/15/2022
Today we made big progress in terms of getting distance and height. We went from one CIM motor to two CIMs and we got much more power and velocity. We tried to put 2 CIMS on one axle but the gearbox we wanted to use had a gear reduction from about ~6000 rpm down to 3000. To fix our issue, we had a pulley on each side driven by a CIM. This was much better and allowed us to make 25 foot shots into our Upper Hub mockup. We took the estimated height of the shooter and subtracted it from the height of our makeshift hub to make sure our test was accurate. We found this height to be 7' 11" since the robot is 10 1/2" off the ground from the center of the axle. We found that the Lexan panel for our hood got a lot of flex while shooting so we plan to add supports behind it. We also want to add more grip on the Lexan so we will use black rubber tape so then the friction the ball receives when firing is more consistent. Now with shooter in a more solidified state, we believe that we will most likely be loading from straight up, which means we have to play with the degrees of contact we get while shooting to make sure we can still make a launchpad shot, still aligning with the Strategy Mind Map.
Prototyping 1/16/2022
We supported our Lexan with more churro tubes, and we got less flex. We tried Gaff tape on the back of the hood and it introduced more friction and in turn, more spin which sent our Cargo off target. We shortened the Lexan from 24" to 20". This allowed us to adjust the angle to a more straight loading design which will be more accurate to what it is going to be on the robot. We also adjusted the amount of compression, making the pins go 10 1/32" from the outside of the axle to the center of the screws and 10 1/2" from the outside of the axle to the center of the churro tube. We will most likely keep the Lexan hood the way it is, with no extra material. We also kept track of the spread of our shots to measure accuracy. We found that the spread was about 3' 7" wide and 1' 6" deep. This is important because both dimensions are less than the Upper Hub diameter of 4 feet. Below are some pictures of the shooter in its current state.
CAD 1/17/2022
After we got most of the data and analysis from our prototype, it was time to move on to the basic CAD to figure out robot real estate and conflicts before we got into the nitty-gritty. We started by scaling up our 2020-21 shooter to the correct dimensions for the Cargo. We then added motors and other auxiliary components to help with our sense of scale. We also calculated trajectories and motor speed and power needed to accomplish the shots outlined in the Mind Map. We plan to continue with our basic CAD and then move into the actual designing and testing phase.


