Fabrication: Difference between revisions
FieldCrate (talk | contribs) No edit summary |
FieldCrate (talk | contribs) No edit summary |
||
| Line 116: | Line 116: | ||
| <br> | | <br> | ||
|- | |- | ||
| | | | ||
| | | <br> | ||
| | | <br> | ||
| <br> | |||
| <br> | | <br> | ||
| <br> | | <br> | ||
|- | |- | ||
| Line 282: | Line 282: | ||
! scope="col" | Averill 2/5/10 | ! scope="col" | Averill 2/5/10 | ||
! scope="col" | 1 | ! scope="col" | 1 | ||
! scope="col" | | ! scope="col" | HOLD | ||
|- | |- | ||
! scope="col" | 2/5/10 | ! scope="col" | 2/5/10 | ||
| Line 291: | Line 291: | ||
! scope="col" | Averill 2/5/10 | ! scope="col" | Averill 2/5/10 | ||
! scope="col" | 1 | ! scope="col" | 1 | ||
! scope="col" | | ! scope="col" | HOLD | ||
|- | |- | ||
! scope="col" | 2/5/10 | ! scope="col" | 2/5/10 | ||
| Line 335: | Line 335: | ||
! scope="col" | | ! scope="col" | | ||
|- | |- | ||
! scope="col" | 2/7/10 | ! scope="col" | 2/7/10 | ||
! scope="col" | 2-01 Ratchet Wheel | ! scope="col" | 2-01 Ratchet Wheel | ||
! scope="col" | Shecca | ! scope="col" | Shecca | ||
! scope="col" | Averill 2/8/10 | ! scope="col" | Averill 2/8/10 | ||
! scope="col" | 2 | ! scope="col" | 2 | ||
! scope="col" | | ! scope="col" | | ||
|- | |- | ||
! scope="col" | 2/7/10 | ! scope="col" | 2/7/10 | ||
! scope="col" | 2-03 Ratchet Pawl | ! scope="col" | 2-03 Ratchet Pawl | ||
! scope="col" | Shecca | ! scope="col" | Shecca | ||
! scope="col" | Averill 2/9/10 | ! scope="col" | Averill 2/9/10 | ||
! scope="col" | 2 | ! scope="col" | 2 | ||
! scope="col" | | ! scope="col" | | ||
|- | |- | ||
Revision as of 04:44, 9 February 2010
How to Submit Parts
In order to get parts made a drawing must be completed and the appropriate files must be submitted (see below for drawing and file requirements). Please create a new line in the table FILES TO BE MADE for each part request and email the proper drawing and required files to aaverill@harris.com. Any questions at all, please ask Amy Averill.
Notice that to save in any of these formats, you must click on "Save Copy As".
Once your part is complete, create a new drawing for your part (.idw):
Drawing Requirements: (use the FIRST/Robotics drawing template under the English tab on the template menu).
The objective of the drawing is to show the main views of the part (front, right, left, top, bottom) and to provide dimensions so that someone can easily understand what the part is supposed to look like. The drawing should also:
- List Material
- State Quantity Required
- Provide Overall Dimensions - length, width, height ( * if the part is a sheetmetal part that is bent, then the dimensions must also include the location
of the bends and the radius used to bend the part)
- Note if any hardware needs to be installed and on which surface (such as standoffs or inserts - PEMS)
- Name of student who created the drawing
- Current Date - this needs to be updated everytime a drawing is submitted to get parts made (this acts as the revision control)
* If the part will be welded, then care must be taken to design with the proper dimensioning scheme leaving room for the weldments
Once the drawing is complete, go to Save a Copy ---> Save a Copy As AUTOCAD .dwg (Autocad LT.)
SAMPLE DRAWING
'Additional' File 'Requirements:' Besides the drawing there are additional files that need to be created in order to store the actual data of the part. Determine if your part is a machined part or cut part and then create the necessary file as listed below.
- If the part is a machined part (think parts made from blocks of aluminum with intricate surfaces) then a .stp file needs to be created
To create a .stp
- Have the part model open (.ipt), go to Save a Copy ---> Save a Copy As ---> Choose file format .stp
- If the part is a cut part (think flat parts with holes, bar stock to be cut to length, sheetmetal that gets bent) then a .dxf file needs to be created. The .dxf
is basically a stripped down version of the drawing.
To create a .dxf
* If the part is bent start by changing the model (.ipt) to the flat pattern (unbent version) before creating the new drawing (.idw). When the top
view is shown it should be in the unbent state
- Create a new drawing (.idw) for the part. Show the top view of the part (with all the cutouts, holes, if there are any)
- There should be no borders or templates
- There should be no dimensions
- Scale the part 1:1
- Then use Save a Copy---> Save a Copy As and save as a .dxf Autocad LT.
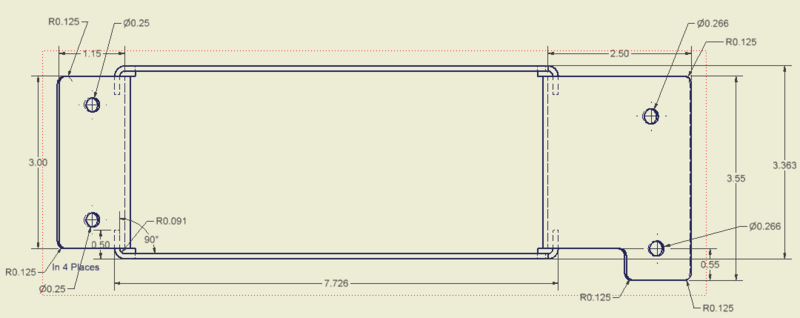
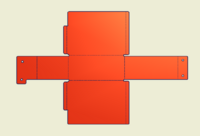
Here's an example of how a SHEET METAL should be sent. It needs two views (folded and flat). The flat view should be clear of everything (template, text, deimensions) while the folded view has all the dimensions needed.
This includes:
- Overall Dimensions (L, W, H)
- (For bends) the inner radius and degrees of the bend
- the length of bends (from the center of the bend to the outer edge of the bent section)
- properly annotated holes (the example doesn't have a thread and cuts all the way through, so is expressed as a diameter)
- Thickness and type of metal used (as a note)
- To keep the drawing clear, write notes on repeated parts (example has 4 of the same bends, and therefore has a note)
Files to be made
| Date | Requested Item | Requestor | Ordered By/Date | QTY | RX'd |
|---|---|---|---|---|---|
Order Status
| Date | Requested Item | Requestor | Ordered By/Date | QTY | RX'd |
|---|---|---|---|---|---|
| 1/13/10 | 2010 Slot Chassis Brkt | Gannon |
Averill 1/13/10 |
8 | 1/15 |
|
1/13/10 |
2010 Motor Mount SS | Gannon | Averill 1/13/10 |
4 | 1/15 |
| 1/13/10 | 2010 Rear Moto Cross Brace | Gannon | Averill 1/13/10 |
1 | 1/15 |
| 1/13/10 | 2010 Bearing Block 3_8ID | Gannon |
Averill 1/14/10 |
4 | 1/18 |
| 1/15/10 | 2010 Camera Mount Sheet 1 | Dora | Averill 1/14/10 |
1 | 1/18 |
| 1/18/10 | 2010 Camera Mount Bent | Dora |
Averill 1/14/10 |
1 | 1/18 |
| 2/1/10 | Control Box Insert | Controls | Averill 2/1/10 | 1 | 2/2 |
| 2/3/10 | Battery Case | Dora | Averill 2/4/10 | 1 | |
| 2/3/10 | Motor Mount | Wolfe | Averill 2/4/10 | 1 | |
| 2/3/10 | Rear Pulley Support | Wolfe | Averill 2/4/10 | 1 | |
| 2/3/10 | Magnet Contact Detector | Wolfe | Averill 2/4/10 | 1 | |
| 2/5/10 | Front Ball Stopper Left | Wolfe | Averill 2/5/10 | 1 | |
| 2/5/10 | Front Ball Stopper | Wolfe | Averill 2/5/10 | 1 | |
| 2/5/10 | Latch | Wolfe | Averill 2/5/10 | 1 | |
| 2/5/10 | Superstructure Gusset | Wolfe | Averill 2/5/10 | 2 | |
| 2/5/10 | Superstructure bolting plate | Wolfe | Averill 2/5/10 | 1 | |
| 2/5/10 | Tom Dempsey | Wolfe | Averill 2/5/10 | 1 | |
| 2/5/10 | Electromagnet span Sheet Metal | Wolfe | Averill 2/5/10 | 1 | HOLD |
| 2/5/10 |
Steel Plate |
Wolfe | Averill 2/5/10 | 1 | HOLD |
| 2/5/10 | Yoke Flange shaft Support | Wolfe | Averill 2/5/10 | 2 | |
| 2/5/10 | Window Motor Moutning Brakcte | Wolfe | Averill 2/5/10 | 2 | |
| 2/5/10 | Window Motor Reinforcing Bracket | Wolfe | Averill 2/5/10 | 1 | |
| 2/5/10 | Arresting Cable Bracket | Wolfe | Averill 2/5/10 | 1 | |
| 2/7/10 | 1-02 | Shecca | Averill 2/8/10 | 1 | |
| 2/7/10 | 1-03 | Shecca | Averill 2/8/10 | 1 | |
| 2/7/10 | 2-01 Ratchet Wheel | Shecca | Averill 2/8/10 | 2 | |
| 2/7/10 | 2-03 Ratchet Pawl | Shecca | Averill 2/9/10 | 2 | |
Parts Built Elsewhere
| Date | Part Name | Where to Make | Builder/Date | QTY | RX'd |
|---|---|---|---|---|---|
Notice that RX'd means recieved.

