2024:Drive Base: Difference between revisions
From 1511Wookiee
Jump to navigationJump to search
Mechanical1 (talk | contribs) No edit summary |
mNo edit summary |
||
| Line 28: | Line 28: | ||
We still need to finish and mount the following: | We still need to finish and mount the following: | ||
*Fabricate the bed pan- this will house all of the electrical panels and other items to small for the C-Channel | *Fabricate the bed pan- this will house all of the electrical panels and other items to small for the C-Channel | ||
Build a moveable plate for the hang- this plate will be most likely be | |||
---- | |||
<span style="text-decoration: underline;">'''1/20/24:'''</span> | |||
Finished CAD Models: | |||
*P059- Swerve Dust Covers | |||
*P058- Bed Pan Spacers 1.125in. | |||
Main Drivebase CAD: | |||
*Attached dust covers | |||
*attached bed pan spacers | |||
*attached the new/updated | |||
Drivebase: | |||
*Greased the 4 swerve modules | |||
*Gave base to electrical, they got the robot wired and started letting Robot Control Systems run calibrations and tests on the drivebase | |||
Looked into/to do: | |||
*Looked into how to mount the bumpers | |||
***Ideas: | |||
***Using Quick release pins with cotter pins | |||
***using a pin that slides into the side of the C-Channel then drop pins in the top with spring steel holding the pins down | |||
---- | |||
<span style="text-decoration: underline;" >'''1/21/24:'''</span> | |||
Revision as of 18:48, 20 January 2024
Drive base status
1/18/24:
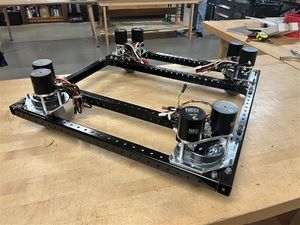
We have a drive base!!
Information:
x4 Mk.4 swerve modules (Neo motors)
x4 25in. side bars
- x2 bars for the outside of the frame
- x2 as support/additional mounting bars in located in the middle of the drive base, the bars also serve as protection for the swerve modules preventing damage to our brand new motors
- From outside bar to outside bar it is a 6.5in offset
- The offset on the inside is 12in. from inside bar to inside bar
x2 27in. horizontal bars, act as end caps'
x8 Andymark Corner Brackets (picture)
-
We still need to finish and mount the following:
- Fabricate the bed pan- this will house all of the electrical panels and other items to small for the C-Channel
Build a moveable plate for the hang- this plate will be most likely be
1/20/24:
Finished CAD Models:
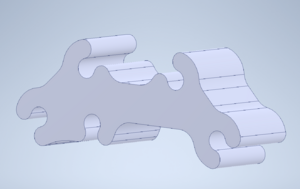
- P059- Swerve Dust Covers
- P058- Bed Pan Spacers 1.125in.
Main Drivebase CAD:
- Attached dust covers
- attached bed pan spacers
- attached the new/updated
Drivebase:
- Greased the 4 swerve modules
- Gave base to electrical, they got the robot wired and started letting Robot Control Systems run calibrations and tests on the drivebase
Looked into/to do:
- Looked into how to mount the bumpers
- Ideas:
- Using Quick release pins with cotter pins
- using a pin that slides into the side of the C-Channel then drop pins in the top with spring steel holding the pins down
1/21/24:

