2016:Controls: Difference between revisions
Programming (talk | contribs) No edit summary |
Programming (talk | contribs) No edit summary |
||
| Line 442: | Line 442: | ||
*Looked up answers to life | *Looked up answers to life | ||
*ctrl shift t is the best keyboard shortcut NA | *ctrl shift t is the best keyboard shortcut NA | ||
==== Update 3/12/2016 ==== | |||
Present: Ethan | |||
Completed: | |||
*No one was here so I couldn't do anything, we should tell each other when we plan to come. | |||
= Archives = | = Archives = | ||
Revision as of 09:56, 12 March 2016
Overall concept
The two driver controls will be XBOX controls.
There will be 7 broken switches.
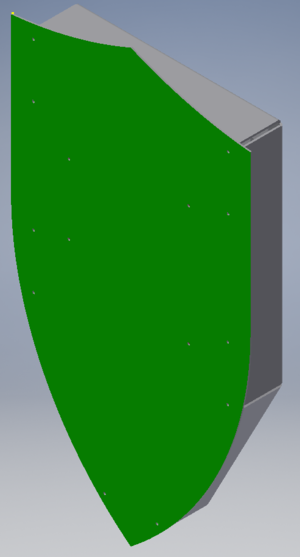
The top of the controls is in the shape of a heater shield. The entire top/shield is detached (no flip up sections); held on with magnets. This allows the shield to be held by the coach/spy during the match. The marketing team will provide the graphic for the shield.
The base will have a strap so driver can carry the entire controls on their back.
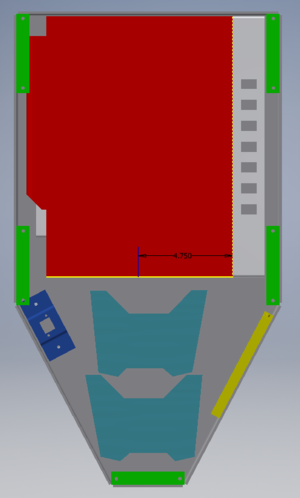
Green - Plates for magnets
Red - laptop
Silver - laptop bracket with holes for broken switches
Blue - XBOX controllers nested together
Dark Blue - Ethernet Bracket (currently interfering with the controllers, working on fixing)
Yellow - Lightning bolt USB hub
Todo
Misc:
- What value is the joystick when it is not plugged in
- Can we tell in the code if the joystick is pluged in or not
- http://forum.unity3d.com/threads/joystick-detection-and-direct-axis-detection.114993/
- Maybe hotwire broken switch board so that we can detect if its plugged in
Dashboard:
- See if we can turn off lights when laptop is running on battery
- http://www.devcurry.com/2010/11/determine-if-your-laptop-is-running-on.html
- Add button on dashboard to reconnect camera and network tables
Lights
- Default to 0/none on power up
Controls:
- Losen up magents (maybe add washers between case and plastic 'tab')
- Restain controllers to controls (what i am thinking is like a velcro strap on a wooden block)
- Maybe bevel the magnets
- Either bevel both the control edge by the top 2 magnets and bevel the top 2 magnets on the shield (might not work at all) or shave a part of edge off the top 2 magnets on the shield (top side and outerside facing the controls side wall/ I think its are best bet without wrecking the sheild)
Horipad Driver Install
Get Driver
Microsoft instructions: http://support.xbox.com/en-US/xbox-on-windows/accessories/connect-xbox-one-controller-to-pc
Follow Windows 7 steps under: Download and install Xbox One Controller driver
You must use Internet Explorer
Get the one called "Microsoft - Other hardware - Microsoft Xbox One Controller" that is for AMD64 (i.e. 64-bit).
If 7-zip is on the PC, use that to expand the contents of the .CAB file.
Install - First Controller on the PC
Plug in control
It will not find one anywhere, so you can tell open the New Hardware wizard and click 'Skip Searching Windows Update'; otherwise you will be waiting forever.
Open Windows' Device Manager; find the Horipad controller; right-click and select 'Update Driver'; then browse to the folder where you unzipped the .CAB file.
It will take a while to install (this is another point where you can tell it to 'Skip Searching Windows Update'.
Once the Gamepad is done, it will then search for a HID driver. Not sure if 'Skip' can be used in this case, so let it finish on its own.
NOTE: if driver fails with error 37, then the problem is that the wdfcoinstaller01011.dll is not in the C:\windows\system32. the installer copies it to c:\windows\system32\driver instead. so copy wdfcoinstaller01011.dll from c:\windows\system32\driver to c:\windows\system32
Install - Second Controller on the PC
Plug in control
Since you have the driver already installed, you can open the New Hardware wizard and click 'Skip Searching Windows Update' for the gamepad.
It will then install the HID portion, again you can 'Skip Searching Windows Update'.
PSoC Install (for lights)
PSoC Creator IDE
Download latest "PSoC Creator" from Cypress (http://www.cypress.com/products/psoc-creator-integrated-design-environment-ide) and install it (use Typical install; at end run Updater and maek sure you have the latest stuff)
For user name and password, you can use: mailme@mailinator.com mailme123
Toolkits and Board Driver Install
Get controls2016 from SVN
Run: vcredist_x86.exe
Run: USBSerialSDKSetup.exe (do Typical install; at end run Updater and maek sure you have the latest stuff)
Run: CY8CKIT04942xxSetupOnlyPackage_revSA.exe ()do Typical install; at end run Updater and maek sure you have the latest stuff)
While you press and hold the SW1 Prog button on the cypress board, plug in the USB cable to the PC (it will take a while for it to install 5 drivers).
Build/Program
Open PSoC Creator (Start -> Programs -> Cypress -> PSoC Creator -> PSoC Creator)
Open project: File -> Open -> Project/Workspace; then browse to FRC2016/controls2016/SCB_Bootloader/SCB_Bootloader.cywrk)
Build project: Build -> Build All Projects
While you press and hold the SW1 Prog button on the cypress board, plug in the USB cable to the PC
Download Boot Loader:
- open programmer: Tools -> Bootloader Host
- set 'File' to C:\Users\Robotics\Desktop\FRC2016\controls2016\SCB_Bootloader\Bootloadable Blinking LED.cydsn\CortexM0\ARM_GCC_493\Debug\Bootloadable Blinking LED.cyacd
- select the com port for the cypress board
- set Baud to 115200; Data Bits 8; Stop Bits 1; Parity None
- download program: Actions -> Program
Meeting Minutes
Update 1/19/2016
Present: Eric, Andrew, Ethan, Zach, Ryan, Jeff
Completed:
- Created a model of the laptop power brick
- Created a model for the Cypress board
- Eric did a little research on the Cypress board. It turns out you can use the debugger half as it's own board and write your own applications for it. It has a USB interface and the debugger implements a HID so we should be able to use it for a HID, probably needs a little more research and evaluation.
- Picked the shield strap, we will reuse last years because it is awesome.
- Put new strap "knobs" on the shopping list.
- Determined that we will do nylon straps on the shield. Will custom fabricate them at a later date.
- Created holes in the shield for these straps, locations are correct but we need PEMs instead of holes because they will look better.
- Picked the approach for attaching the shield to the box. We will use cabinet magnets on each of the corners of the box and corrosponding metal plates mounted on the shield.
- Finished and submitted the drawing for the laptop holder.
- Started a drawing for the shield, see the Todo list for what needs to be finished.
- Picked the retractable cord and put it on the shopping list. We will just retract it from inside the box. We picked the one we did because it was the longest. We may still need to hack on an end if we need multiple outlets and to add length.
- Created part numbers for the three parts (laptop holder, shield, base) on the parts fabrication spreadsheet.
Update 1/20/2016
Present: Andrew, Ethan, Zach, Ryan, Mr. Byers
Completed:
- Picked cabinet magnets
- Decided on PEM stud:
- FH-832-5ZI
- Thread Size: .164-32 (#8-32)
- Hole Size: .163 '± .003''
- Updated top of shield and PEM holes
- Decided ethernet mount and started creation of bracket in CAD
Update 1/21/2016
Present: Andrew, Ryan, Jeff, Mr. Byers, Eric
Completed:
- Correct (hopefully) drawing of the laptop base submitted.
- Continued work on the Ethernet bracket.
- Created model of the magnetic door latch.
- Added magnetic door latch model to the controls assembly.
- Created and placed brackets in the assembly to mate with the magnetic door latch.
Update 1/23/2016
Present: Andrew, Ryan, Eric, Zach, Ethan, Jeff, Mr. Byers
Completed:
- Decided on PEM stud:
- Hole Size: .163 ± .003\
- Thread Size: .164-32 (#8-32)
- FH-832-5ZI
- Finalize the placement of the magenetic bracket and steel plates.
- Add PEM studs for the steel plates in each corner of the shield to match up with the drawer magnets that are in the base
- This involves creating the steel plates which Eric thinks we should fabricate to be a bit thicker than the normal plates to give some extra holding power and alignment and have two screw holes.
- Finished drawings of laptop holder, shield, ethernet brachet and submitted them to Amy
- Looked at boards for lights/HID:
- PSoC 4 - could not find any HID samples; found them for PSoC3 & 5
- XMC1200/1300 - could not find any HID samples; they have some for XMC4400/XMC4500
Update 1/24/16
Present: Andrew, Zach, Ethan, Jeff, Mr. Byers
Completed:
- Added holes into base for magnetic cabinet latches
- Confirmed position of e-net bracket
- Created electronic assembly (and parts) to hold: joystick board, PSoC, power converter, lights electronics
- Add #8 screw holes on the corners of the base for the guitar strap knobs
- USB hub: location; mounting (use velcro)
- Positioned power brick and XBOX controls
- Fixed bend radius and size for base
- added handle (no holes yet, can adjust later)
Update 1/26/16
Present: Andrew, Eric, Mr. Byers
Completed:
- Completed base drawings.
Update 1/27/16
Present: Andrew, Ethan, Zach, Eric, Mr. Byers
Completed:
- Fixed base drawings and sent them off
- Received Laptop Holder, Shield and Ethernet Bracket
- Chose paint scheme
- Worked on LED controller
Update 1/28/16
Present: Andrew, Ethan, Zach, Ryan, Mr. Byers
Completed:
- Began to crimp wires for eStop Robotics CCI
- Helped make shop drawings
Update 1/30/16
Present: Andrew, Ethan, Zach, Ryan, Mr. Byers, Eric
Completed:
- adjusted steel for magnets/gt shield to fit
- cleaned up welds on base
- met with strategy to go over control button mappings and items desired for the dashboard
- determined USB cable extensions not needed for controllers
- Spray painted parts
Update 1/31/16
Present: Jeff, Ethan, Ryan, Andrew
Completed:
- Attached ethernet cable to bracket
- Moved painted stuff to our closet space.
- Ethan helped work on the drivebase
- The scaler subteam is behind so Andrew helped work on the shoulder today
Update 2/2/16
Present: Jeff, Andrew, Eric, Mr Byers, Ryan, Zach
Completed:
- Attached velcro to top of laptop tray
- Andrew helped the scaler subteam again today
- Look over painted parts to see if any touch up is needed
- Shield: attached steel for magnets; worked on strap
- Base: attached guitar strap holders; mounted ethernet bracket; mounted laptop holder; mounted laptop power supply; mounted USB hub; mounted perf board
- Broken switches: put blue spade connectors on ribbon cable; created 'jumper' wire to go from switch to switch; temporarialy connected to eStop board to valid the switches; mounted to laptop holder
Update 2/3/16
Present: Andrew, Ryan, Ethan, Zach, Eric
Completed:
- Andrew worked on scaler CAD & drawings again
- Metal plates installed and bolt heads cut off.
- Frabricated nut/washer for straps.
- Holes marked and standoffs picked for broken switch board.
Update 2/4/16
Present: Andrew, Ryan, Ethan, Zach, Mr. Byers
Completed:
- Andrew worked on scaler CAD & drawings again
- eStop board mounted and wired
- investigated number of lights that can be driven with USB
- filed and painted nuts for shield straps
- game controllers working on controls laptop
- added instructions on how to install driver for controllers
- ░░░░▄▀▀▀▀▀█▀▄▄▄▄░░░░
░░▄▀▒▓▒▓▓▒▓▒▒▓▒▓▀▄░░
▄▀▒▒▓▒▓▒▒▓▒▓▒▓▓▒▒▓█░
█▓▒▓▒▓▒▓▓▓░░░░░░▓▓█░
█▓▓▓▓▓▒▓▒░░wew░░░▓█░
▓▓▓▓▓▒░░░░░░░░░░░░█░
▓▓▓▓░░░░▄▄▄▄░░░▄█▄▀░
░▀▄▓░░▒▀▓▓▒▒░░█▓▒▒░░
▀▄░░░░░░░░░░░░▀▄▒▒█░
░▀░▀░░░░░▒▒▀▄▄▒▀▒▒█░
░░▀░░░░░░▒▄▄▒▄▄▄▒▒█░
░░░▀▄▄▒▒░░░░▀▀▒▒▄▀░░
░░░░░▀█▄▒▒░░░░▒▄▀░░░
░░░░░░░░▀▀█▄▄▄▄▀░░░░
░░░░░░░░░░░░░░░░░░░░ - ░░░░▄▀▀▀▀▀█▀▄▄▄▄░░░░
░░▄▀▒▓▒▓▓▒▓▒▒▓▒▓▀▄░░
▄▀▒▒▓▒▓▒▒▓▒▓▒▓▓▒▒▓█░
█▓▒▓▒▓▒▓▓▓░░░░░░▓▓█░
█▓▓▓▓▓▒▓▒░░░░░░░░▓█░
▓▓▓▓▓▒░░wut ░░░░░░░█░
▓▓▓▓░░░░▄▄▄▄░░░▄█▄▀░
░▀▄▓░░▒▀▓▓▒▒░░█▓▒▒░░
▀▄░░░ayyy░░░░░░▀▄▒▒█░
░▀░▀░░░░░▒▒▀▄▄▒▀▒▒█░
░░▀░░░░░░▒▄▄▒▄▄▄▒▒█░
░░░▀▄▄▒▒░░░░▀▀▒▒▄▀░░
░░░░░▀█▄▒▒░░░░▒▄▀░░░
░░░░░░░░▀▀█▄▄▄▄▀░░░░
░░░░░░░░░░░░░░░░░░░░
(Don't remove my kappas)
Update 2/6/16
Present: Andrew, Ryan, Zach, Eric, Mr. Byers
Completed:
- Andrew worked on CAD
- programming students met to start code layout
- mounted magnets
- added spacers to shield straps and completed mounting
- re-painted shield
- mounted and wired PSoC4 board (going directyl from USB
- tried to setup PSoC environment and downloaded sample, but couldn't get it to program
- game controllers working on Kate's programming laptop
- told marketing they can start painting shield
Update 2/7/16
Present: Andrew, Zach, Ethan, Mr. Byers
Completed:
- set up SVN accounts
- started programming, made Controls.h and Controls.cpp files
Update 2/9/2016
Present: Mr.Byers, Eric, Andrew, Ethan, Zach, Ryan, Jeff
Completed:
- More programming
- not sure what jeff did
- Andrew worked on drivetrain/breacher testing
Update 2/10/2016
Present: Eric, Andrew, Ethan, Zach, Ryan
Completed:
- Finished broken switch programming
- Put the connector on the LED string.
- Got the correct package installed for the CY8CKIT and created the project. We got to the end (loading code) but the project was targeting the wrong device (the 4100 board, we have the 4200 board). I updated the device but something is still not working so this needs to be looked at.
- We marked the holes for the handle, they need to be drilled so that the handle can be installed.
Update 2/11/2016
Present: Ethan, Ryan, Jeff, Mr.Byers, Andrew
Completed:
- Continued work on programming Xbox controllers
- Ryan attempted to program lights
Update 2/13/2016
Present: Ethan, Ryan, Eric, Bdawg, Zach, Andrew
Completed:
- Finished driver controls and broken switchs
- Project is done for lights (can start programming them)
- Loaded Cypress tools on second laptop (labelled Ryan Controls Light)
- Documented Cypress instructions
Update 2/14/2016
Present: Ethan, Zach, Andrew, Mr. Byers AKA Bdawg for future reference
Completed:
- Attached lights to controls (cut away perfboard and ethernet bracket)
- mounted controllers
- Installed Visual studio on controls laptop
- Added labels to broken switches.
- Created sheet with xbox controller button mapping and put it inside controls base.
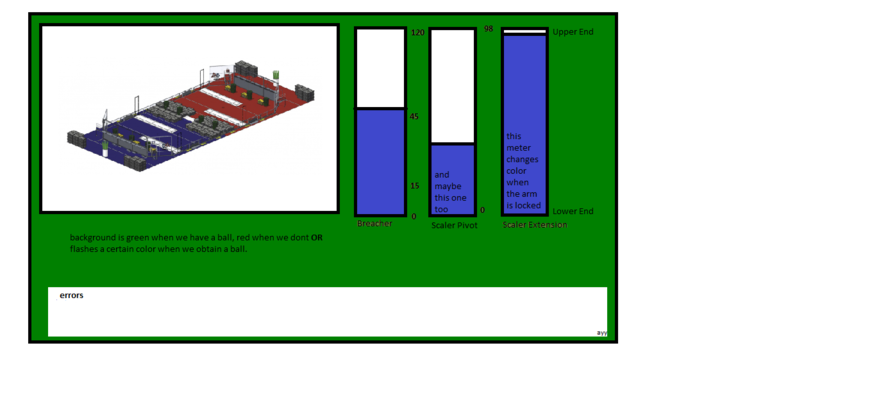
- Started coming up with a layout for dashboard:
Update 2/17/16
Present: Ethan, Ryan, Andrew, Eric
Completed:
- Replaced the USB hub in the control box with one that works.
- Ethan and Andrew helped out test the robot control code with the robot.
- Implemented a first cut at getting the lights controlled using the serial port.
- This was sucessful but needs to be cleaned up a bit.
- It was done on the "secondary" laptop and not committed to the archive yet.
Update 2/18/2016
Present: Ethan, Ryan, Mr Byers
Completed:
- review dashboard code
- get dashboard building on laptop
- put in new Targus USB hub (latest lightening bolt hub still had issues)
Update 2/20/2016
Present: Ethan, Mr Byers, Ryan
Completed:
- More dashboard coding
Update 2/23/2016
Present: Ethan, Mr Byers, Ryan, Zach
Completed:
- Reviewed code
Update 2/27/2016
Present: Ethan, Mr Byers, Zach
Completed:
- Worked on dashboard
- Kind of finished lights
Update 2/28/2016
Present: Mr Byers, Zach
Completed:
- Something
Update 3/8/2016
Present: Mr Byers, Zach, Ethan
Completed:
- Updated wiki
- Looked up answers to life
- ctrl shift t is the best keyboard shortcut NA
Update 3/12/2016
Present: Ethan
Completed:
- No one was here so I couldn't do anything, we should tell each other when we plan to come.


