Preseason Lesson4: Difference between revisions
Programming (talk | contribs) No edit summary |
No edit summary |
||
| (6 intermediate revisions by 2 users not shown) | |||
| Line 1: | Line 1: | ||
= Introduction = | |||
This lesson will be split in two parts. Complete and test out part 1 before moving to part 2! | |||
Overall, this lesson will use most of what you have already learned to do similar, but still different, things. Our previous lessons have focused on control that mimics some simple appendages. This lesson will focus on control that might be more appropriate for a drive system. | |||
We will be using a different motor and controller for this lesson and all new code you write will not directly interact with your existing code from previous lessons (as in, you won't be changing your existing code, just adding new/additional things to it). | |||
Before starting this lesson, you should have completed the prior 3 lessons. Start with your code from the end of [[Preseason Lesson3|Lesson 3]] | |||
= Part 1: Control Speed of Motor = | |||
In this part, you will use the Y-axis of a new Joystick to directly control the speed of a new motor. We will use a dead-band as we did in prior lessons to prevent accidental driving of the motor from small movement of the joystick. | |||
== Part 1 Detailed Goals == | |||
* Use the Y-axis of the new Joystick on the driver station to control a new motor | |||
* If the stick is moved forward, the motor should go forward. If moved down/toward you, it should drive the motor backward. | |||
* The motor to control is the one immediately to the right of the one you have been using until now. | |||
** This motor is also controlled by a TalonSRX motor controller | |||
** You will need to look at the labels on the test board to know what the motor controller's ID/address number is | |||
* Use a deadband of +/- 1/4 of the Y axis range (so, motor should not move unless the stick is moved more than 1/4 of the travel) | |||
* The speed of the motor should directly match the amount that the stick is moved | |||
== Part 1 Guided Help == | |||
This lesson will have significantly less help than prior ones. Most of what you need to do is using things you have already done! Here are some ordered hints to get you there: | |||
# You will need to make a new Joystick object to represent the new Joystick. Look at the driver station to get the address/ID number! | |||
# You will need to make a new motor controller (TalonSRX) object to control the new motor. The ID of the new motor's controller is labelled on it on the test board. | |||
# In prior lessons you made a deadband of 1/3rd the motion of the controller. Remember that for this lesson, we are using 1/4 the range of motion of the joystick for the deadband! | |||
# Once you have handled the deadband, the speed of the motor can be simply set to the value read from the Joystick Y axis when you are outside of the deadband. | |||
== Part 1 Test == | |||
As always, coordinate with your teammates to use the test board to test. Test the following: | |||
# The new motor should not move if the joystick is left stationary. | |||
# Move the joystick a small amount off center. The motor should not move! | |||
# Move the joystick forward more than 1/4 off center, slowly, toward fully forward. You should see the motor move slowly once you pass 1/4, then speed up and be going full speed when all the way forward. The LED on the motor controller should be flashing green while moving until you are fully forward. Verify that at full forward the light is solid green. | |||
# Repeat the test for pulling back on the joystick. This time the controller should flash red until fully pulled back, then turn solid red. | |||
# Verify that the motor moving is the correct one (the one next to Motor 5 from the previous lessons) | |||
# Notice that when you pass the 1/4 mark, the motor jumps from stopped/off to a fairly substantial speed. It doesn't scale from 0 smoothly. For Part 2 we will address this. | |||
= Part 2: Smoother Speed Control = | |||
In this part, we will improve the control of the motor to smooth out control so that we get a full range of speed control. The goal is to smooth out our speed response, particularly when the stick is moved just outside the deadzone. | |||
To accomplish this we will primarily use math knowledge! You may find the use of graphs to be helpful - we have included some below! | |||
== Part 2: Detailed Goals == | |||
* Use the same motor and joystick from Part 1 and use code from Part 1 as a starting point | |||
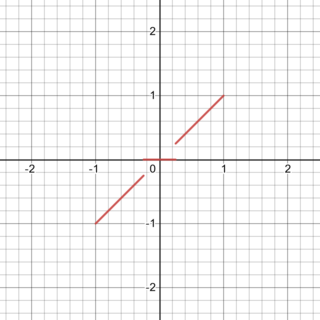
* Right now we have a response that looks like this: [[File:Programming-simple-linear-deadband.png|320px|center|border]] | |||
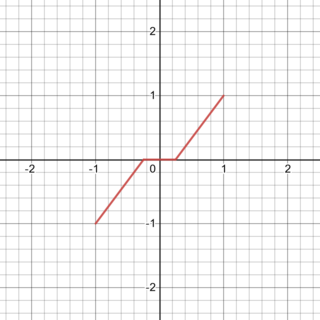
* The goal is to have a response that looks like this: [[File:Programming-smooth-linear-deadband.png|320px|center|border]] | |||
== Part 2: Guided Help == | |||
Changing the response of the motor to the joystick's value is most easily done using math-based manipulations. | |||
# Before you work on new code, take a moment and examine the problem statement in the Part 2 Detailed Goals above and the associated graphs. | |||
#* '''A large part of programming isn't actually writing code - it is figuring out what the problem to solve is and a good way to solve it!''' | |||
#* On scrap paper or in a graphing tool of your choosing, write math equations (y = ?some function of x?) that represent the original and desired graphs above. This can give you an excellent starting point for doing this in code. | |||
#* You may find it easier to write separate equations for the different regions of x (x < -0.25, x in deadband from -0.25 to 0.25, and x > 0.25) | |||
# Now that you have a mathematical relationship of the desired response, you can translate them to code: | |||
#* The different regions can be handled using if statements | |||
#* Math operations on variables can be done in a fairly straightforward manner. Let's assume you had some variable y and some variable x, both of type double. You can do math based on x and store the result in y. "y" can then be used later in the program in if statements, more math operations, or passed to functions like motor controller's Set(). Here are some examples of math operations: | |||
#** '''Addition:''' y = x + 4; | |||
#** '''Subtraction:''' y = x - 1.5; | |||
#** '''Multiplication:''' y = x * x; (y = "x squared") | |||
#** '''Division:''' y = x / 2.0; | |||
#** You can also do an operation on the same variable you are storing the result to. These two things are exactly the same: | |||
#*** y = y + 10; | |||
#*** y += 10; | |||
#*** Both of these add 10 to the value of y and store the result as the new value of y | |||
#* '''Use the above examples and the equations you figured out at the start to change your code from Part 1 to achieve the desired functionality''' | |||
== Part 2: Testing == | |||
* Repeat [[#Part 1: Testing]], but this time the response of the motor should be slower and smoother as you exit the deadzone on the controller. | |||
= Solution = | |||
'''This is one possible solution!''' There are many ways to accomplish the goal(s) - this is just one way! | |||
''robot.h'' | |||
<pre class="mw-collapsible mw-collapsed"> | |||
// Copyright (c) FIRST and other WPILib contributors. | |||
// Open Source Software; you can modify and/or share it under the terms of | |||
// the WPILib BSD license file in the root directory of this project. | |||
#pragma once | |||
#include <frc/TimedRobot.h> | |||
#include <ctre/Phoenix.h> | |||
#include <frc/Joystick.h> | |||
#include <frc/DigitalInput.h> | |||
#include <frc/Jaguar.h> | |||
#include <frc/Counter.h> | |||
using namespace ctre::phoenix::motorcontrol::can; | |||
using namespace frc; | |||
class Robot : public frc::TimedRobot { | |||
// parts of a robot "appendage" | |||
TalonSRX motor{5}; | |||
Joystick controller{0}; | |||
DigitalInput limitSwitchFwd{1}; | |||
DigitalInput limitSwitchRev{0}; | |||
// parts of our robot's drive system | |||
TalonSRX driveMotor{3}; | |||
Joystick driveJoystick{1}; | |||
public: | |||
void RobotInit() override; | |||
void RobotPeriodic() override; | |||
void AutonomousInit() override; | |||
void AutonomousPeriodic() override; | |||
void TeleopInit() override; | |||
void TeleopPeriodic() override; | |||
void DisabledInit() override; | |||
void DisabledPeriodic() override; | |||
void TestInit() override; | |||
void TestPeriodic() override; | |||
}; | |||
</pre> | |||
''robot.cpp'' | |||
<pre class="mw-collapsible mw-collapsed"> | |||
// Copyright (c) FIRST and other WPILib contributors. | |||
// Open Source Software; you can modify and/or share it under the terms of | |||
// the WPILib BSD license file in the root directory of this project. | |||
#include "Robot.h" | |||
void Robot::RobotInit() {} | |||
void Robot::RobotPeriodic() {} | |||
void Robot::AutonomousInit() {} | |||
void Robot::AutonomousPeriodic() {} | |||
void Robot::TeleopInit() {} | |||
void Robot::TeleopPeriodic() { | |||
// "appendage" control | |||
bool buttonOnePressed = false; | |||
buttonOnePressed = controller.GetRawButton(1); | |||
double leftYAxis = 0; | |||
// controller Y axis is inverted - forward is negative, reverse is positive | |||
// so flip it | |||
leftYAxis = -1 * controller.GetRawAxis(1); | |||
bool fwdLimitTripped = false; | |||
bool revLimitTripped = false; | |||
fwdLimitTripped = limitSwitchFwd.Get(); | |||
revLimitTripped = limitSwitchRev.Get(); | |||
if (buttonOnePressed) { | |||
if (leftYAxis > 0.33 && fwdLimitTripped != true) { | |||
motor.Set(ControlMode::PercentOutput, 0.25); | |||
} else if (leftYAxis < -0.33 && !revLimitTripped) { | |||
motor.Set(ControlMode::PercentOutput, -0.25); | |||
} else { | |||
motor.Set(ControlMode::PercentOutput, 0); | |||
} | |||
} else { | |||
motor.Set(ControlMode::PercentOutput, 0); | |||
} | |||
// "drive" control | |||
double driveYAxis = 0; | |||
driveYAxis = -1 * driveJoystick.GetY(); | |||
// Part 1 solution - remove through to "end of part 1 solution" | |||
// if you uncomment part 2 | |||
if (driveYAxis > 0.25 || driveYAxis < -0.25) { | |||
driveMotor.Set(ControlMode::PercentOutput, driveYAxis); | |||
} else { | |||
driveMotor.Set(ControlMode::PercentOutput, 0); | |||
} | |||
// End of part 1 solution | |||
// Part 2 solution. Uncomment this and remove the above | |||
// Part 1 solution section. This is one possible way to do this, there are | |||
// many other ways! | |||
/* | |||
if (driveYAxis > 0.25) { | |||
// Change from (0.25, 1] to (0, 0.75] | |||
driveYAxis -= 0.25; | |||
// Now normalize (linearly scale to be full range between 0 and 1) | |||
driveYAxis = driveYAxis / 0.75; | |||
driveMotor.Set(ControlMode::PercentOutput, driveYAxis); | |||
} else if (driveYAxis < -0.25) { | |||
// Similar to above case, but in negative space so reverse signs as needed | |||
// Change from (-0.25, -1] to (0, -0.75] | |||
driveYAxis += 0.25; | |||
// Now normalize (linearly scale to be full range between 0 and -1) | |||
driveYAxis = driveYAxis / 0.75; | |||
driveMotor.Set(ControlMode::PercentOutput, driveYAxis); | |||
} else { | |||
driveMotor.Set(ControlMode::PercentOutput, 0); | |||
} | |||
*/ | |||
} | |||
void Robot::DisabledInit() {} | |||
void Robot::DisabledPeriodic() {} | |||
void Robot::TestInit() { | |||
} | |||
void Robot::TestPeriodic() {} | |||
#ifndef RUNNING_FRC_TESTS | |||
< | int main() { | ||
return frc::StartRobot<Robot>(); | |||
} | |||
#endif | |||
</pre> | |||
Latest revision as of 14:14, 30 December 2021
Introduction
This lesson will be split in two parts. Complete and test out part 1 before moving to part 2!
Overall, this lesson will use most of what you have already learned to do similar, but still different, things. Our previous lessons have focused on control that mimics some simple appendages. This lesson will focus on control that might be more appropriate for a drive system.
We will be using a different motor and controller for this lesson and all new code you write will not directly interact with your existing code from previous lessons (as in, you won't be changing your existing code, just adding new/additional things to it).
Before starting this lesson, you should have completed the prior 3 lessons. Start with your code from the end of Lesson 3
Part 1: Control Speed of Motor
In this part, you will use the Y-axis of a new Joystick to directly control the speed of a new motor. We will use a dead-band as we did in prior lessons to prevent accidental driving of the motor from small movement of the joystick.
Part 1 Detailed Goals
- Use the Y-axis of the new Joystick on the driver station to control a new motor
- If the stick is moved forward, the motor should go forward. If moved down/toward you, it should drive the motor backward.
- The motor to control is the one immediately to the right of the one you have been using until now.
- This motor is also controlled by a TalonSRX motor controller
- You will need to look at the labels on the test board to know what the motor controller's ID/address number is
- Use a deadband of +/- 1/4 of the Y axis range (so, motor should not move unless the stick is moved more than 1/4 of the travel)
- The speed of the motor should directly match the amount that the stick is moved
Part 1 Guided Help
This lesson will have significantly less help than prior ones. Most of what you need to do is using things you have already done! Here are some ordered hints to get you there:
- You will need to make a new Joystick object to represent the new Joystick. Look at the driver station to get the address/ID number!
- You will need to make a new motor controller (TalonSRX) object to control the new motor. The ID of the new motor's controller is labelled on it on the test board.
- In prior lessons you made a deadband of 1/3rd the motion of the controller. Remember that for this lesson, we are using 1/4 the range of motion of the joystick for the deadband!
- Once you have handled the deadband, the speed of the motor can be simply set to the value read from the Joystick Y axis when you are outside of the deadband.
Part 1 Test
As always, coordinate with your teammates to use the test board to test. Test the following:
- The new motor should not move if the joystick is left stationary.
- Move the joystick a small amount off center. The motor should not move!
- Move the joystick forward more than 1/4 off center, slowly, toward fully forward. You should see the motor move slowly once you pass 1/4, then speed up and be going full speed when all the way forward. The LED on the motor controller should be flashing green while moving until you are fully forward. Verify that at full forward the light is solid green.
- Repeat the test for pulling back on the joystick. This time the controller should flash red until fully pulled back, then turn solid red.
- Verify that the motor moving is the correct one (the one next to Motor 5 from the previous lessons)
- Notice that when you pass the 1/4 mark, the motor jumps from stopped/off to a fairly substantial speed. It doesn't scale from 0 smoothly. For Part 2 we will address this.
Part 2: Smoother Speed Control
In this part, we will improve the control of the motor to smooth out control so that we get a full range of speed control. The goal is to smooth out our speed response, particularly when the stick is moved just outside the deadzone.
To accomplish this we will primarily use math knowledge! You may find the use of graphs to be helpful - we have included some below!
Part 2: Detailed Goals
- Use the same motor and joystick from Part 1 and use code from Part 1 as a starting point
- Right now we have a response that looks like this:
- The goal is to have a response that looks like this:


Part 2: Guided Help
Changing the response of the motor to the joystick's value is most easily done using math-based manipulations.
- Before you work on new code, take a moment and examine the problem statement in the Part 2 Detailed Goals above and the associated graphs.
- A large part of programming isn't actually writing code - it is figuring out what the problem to solve is and a good way to solve it!
- On scrap paper or in a graphing tool of your choosing, write math equations (y = ?some function of x?) that represent the original and desired graphs above. This can give you an excellent starting point for doing this in code.
- You may find it easier to write separate equations for the different regions of x (x < -0.25, x in deadband from -0.25 to 0.25, and x > 0.25)
- Now that you have a mathematical relationship of the desired response, you can translate them to code:
- The different regions can be handled using if statements
- Math operations on variables can be done in a fairly straightforward manner. Let's assume you had some variable y and some variable x, both of type double. You can do math based on x and store the result in y. "y" can then be used later in the program in if statements, more math operations, or passed to functions like motor controller's Set(). Here are some examples of math operations:
- Addition: y = x + 4;
- Subtraction: y = x - 1.5;
- Multiplication: y = x * x; (y = "x squared")
- Division: y = x / 2.0;
- You can also do an operation on the same variable you are storing the result to. These two things are exactly the same:
- y = y + 10;
- y += 10;
- Both of these add 10 to the value of y and store the result as the new value of y
- Use the above examples and the equations you figured out at the start to change your code from Part 1 to achieve the desired functionality
Part 2: Testing
- Repeat #Part 1: Testing, but this time the response of the motor should be slower and smoother as you exit the deadzone on the controller.
Solution
This is one possible solution! There are many ways to accomplish the goal(s) - this is just one way!
robot.h
// Copyright (c) FIRST and other WPILib contributors.
// Open Source Software; you can modify and/or share it under the terms of
// the WPILib BSD license file in the root directory of this project.

#pragma once

#include <frc/TimedRobot.h>
#include <ctre/Phoenix.h>
#include <frc/Joystick.h>
#include <frc/DigitalInput.h>
#include <frc/Jaguar.h>
#include <frc/Counter.h>

using namespace ctre::phoenix::motorcontrol::can;
using namespace frc;

class Robot : public frc::TimedRobot {
  // parts of a robot "appendage"
  TalonSRX motor{5};
  Joystick controller{0};
  DigitalInput limitSwitchFwd{1};
  DigitalInput limitSwitchRev{0};

  // parts of our robot's drive system
  TalonSRX driveMotor{3};
  Joystick driveJoystick{1};


 public:
  void RobotInit() override;
  void RobotPeriodic() override;

  void AutonomousInit() override;
  void AutonomousPeriodic() override;

  void TeleopInit() override;
  void TeleopPeriodic() override;

  void DisabledInit() override;
  void DisabledPeriodic() override;

  void TestInit() override;
  void TestPeriodic() override;
};
robot.cpp
// Copyright (c) FIRST and other WPILib contributors.
// Open Source Software; you can modify and/or share it under the terms of
// the WPILib BSD license file in the root directory of this project.

#include "Robot.h"

void Robot::RobotInit() {}
void Robot::RobotPeriodic() {}

void Robot::AutonomousInit() {}
void Robot::AutonomousPeriodic() {}

void Robot::TeleopInit() {}
void Robot::TeleopPeriodic() {
  // "appendage" control
  bool buttonOnePressed = false;
  buttonOnePressed = controller.GetRawButton(1);
  double leftYAxis = 0;
  // controller Y axis is inverted - forward is negative, reverse is positive
  // so flip it
  leftYAxis = -1 * controller.GetRawAxis(1);

  bool fwdLimitTripped = false;
  bool revLimitTripped = false;

  fwdLimitTripped = limitSwitchFwd.Get();
  revLimitTripped = limitSwitchRev.Get();

  if (buttonOnePressed) {
    if (leftYAxis > 0.33 && fwdLimitTripped != true) {
      motor.Set(ControlMode::PercentOutput, 0.25);
    } else if (leftYAxis < -0.33 && !revLimitTripped) {
      motor.Set(ControlMode::PercentOutput, -0.25);
    } else {
      motor.Set(ControlMode::PercentOutput, 0);
    }
  } else {
    motor.Set(ControlMode::PercentOutput, 0);
  }


  // "drive" control
  double driveYAxis = 0;
  driveYAxis = -1 * driveJoystick.GetY();

  // Part 1 solution - remove through to "end of part 1 solution"
  // if you uncomment part 2
  if (driveYAxis > 0.25 || driveYAxis < -0.25) {
    driveMotor.Set(ControlMode::PercentOutput, driveYAxis);
  } else {
    driveMotor.Set(ControlMode::PercentOutput, 0);
  }
  // End of part 1 solution

  // Part 2 solution.  Uncomment this and remove the above
  // Part 1 solution section. This is one possible way to do this, there are
  // many other ways!
  /*
  if (driveYAxis > 0.25) {
    // Change from (0.25, 1] to (0, 0.75]
    driveYAxis -= 0.25;
    // Now normalize (linearly scale to be full range between 0 and 1)
    driveYAxis = driveYAxis / 0.75;
    driveMotor.Set(ControlMode::PercentOutput, driveYAxis);
  } else if (driveYAxis < -0.25) {
    // Similar to above case, but in negative space so reverse signs as needed
    // Change from (-0.25, -1] to (0, -0.75]
    driveYAxis += 0.25;
    // Now normalize (linearly scale to be full range between 0 and -1)
    driveYAxis = driveYAxis / 0.75;
    driveMotor.Set(ControlMode::PercentOutput, driveYAxis);
  } else {
    driveMotor.Set(ControlMode::PercentOutput, 0);
  }
  */
}

void Robot::DisabledInit() {}
void Robot::DisabledPeriodic() {}

void Robot::TestInit() {
}
void Robot::TestPeriodic() {}

#ifndef RUNNING_FRC_TESTS
int main() {
  return frc::StartRobot<Robot>();
}
#endif