2018:Controls: Difference between revisions
No edit summary |
No edit summary |
||
| Line 109: | Line 109: | ||
*[http://www.jetpress.com/Products.aspx/bwejaatthl/30Series-SpringClawLatch/ http://www.jetpress.com/Products.aspx/bwejaatthl/30Series-SpringClawLatch/] | *[http://www.jetpress.com/Products.aspx/bwejaatthl/30Series-SpringClawLatch/ http://www.jetpress.com/Products.aspx/bwejaatthl/30Series-SpringClawLatch/] | ||
<div class="mw-parser-output"><div class="mw-parser-output"><div class="mw-parser-output"><div class="mw-parser-output"><div class="mw-parser-output"><div class="mw-parser-output"><div class="mw-parser-output"> | <div class="mw-parser-output"><div class="mw-parser-output"><div class="mw-parser-output"><div class="mw-parser-output"><div class="mw-parser-output"><div class="mw-parser-output"><div class="mw-parser-output"> | ||
<div class="mw-parser-output"> | |||
= Meeting Minutes = | = Meeting Minutes = | ||
| Line 304: | Line 305: | ||
<span style="font-size: large;">2/20</span> | <span style="font-size: large;">2/20</span> | ||
'''Attendees:''' '''Work Completed:''' </div> | |||
'''Attendees:''' | |||
'''Work Completed:''' | |||
</div> | |||
= Controls Rules = | = Controls Rules = | ||
Revision as of 09:18, 3 February 2018
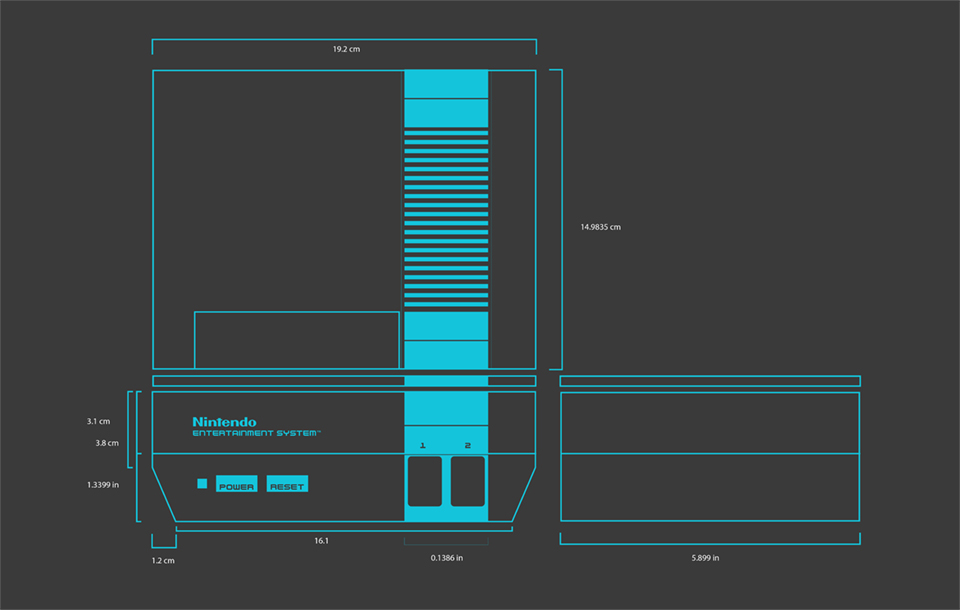
Overall Concept

- Modeled after the NES
- 16" W x 13.5" D x 6.5" H (NES is 10 x 8 x 3.5)
- 2 Xbox controllers - will store on top of the laptop, within the "case"
- This year we are using two wired Xbox 360 controllers. model #:S9F-00001 manufactured by Microsoft.
- 2 USB ports on front (in place of NES controller plugs) - these are extra ports, Xbox controller will be plugged into hub within "case"
- Ethernet plug and power plug will be on side (in place of NES Video ports)
- Power will be a separate cable (will stow within "case"; may have an external holder so cord can stay plugged in)
- NES Cartridge door will open to expose broken switches while top is closed (not needed, just for fun)
- The NES power LED will light up when the laptop is (and dashboard is running)
- The top of the "case" will flip open, towards the left (where the NES color breaks are)
- TBD if NES buttons will be functional
- "Case" will be painted to closely match the NES (e.g. top & bottom different colors; black 'stripe' over vents and USB ports)
- TBD handle for carrying
To do
Not Started
- Find 4 port USB hub for 2 controllers and 2 ports on the front. Some USB hubs(https://goo.gl/FzPWuS)(https://goo.gl/C2J48d) maybe both.
- Think about lights and if we want to give them more power(Current setup cant do purple)
- Handle decided. Springloaded on back (https://www.parts-express.com/penn-elcom-h1053k-surface-mount-handle-black--262-305?utm_source=google&utm_medium=cpc&utm_campaign=pla)
- Overall paint and letter scheme (low priority).
In Process
- Order/Find
- Piano Hinge for door and body - 2 (https://www.homedepot.com/p/Everbilt-1-1-2-in-x-30-in-Bright-Nickel-Continuous-Hinge-15175/202034057, can cut in half to use for both door and body)
- Doubble rolling catch - 2 (https://www.homedepot.com/p/Liberty-Statuary-Bronze-Double-Roller-Catch-C08820C-STB-P1/100114919)
- USB ports for front - 2 [we have these]
- Ethernet Port for side - 1 [we have these]
- Power Plug for side - 1 [we have these]
- Broken Switches - 6 [we have these]
- Buttons for power and such - 3D Print - 2
- Magnetic Latch for door - 1 [decided on just gettign a magnet and glueing it]
- LED for front - acrillic - 2
- Nuts and Bolts - TBD
- Screws for USB and Ethernet Ports [we have these]
- Perf Board for PWBs (3" x 6") - 1 ***Eric
- 4 and #8 Standoffs (To hold up perf board from base) - 12 [we have these]
- Spade connectors for broken switches - 12 [we have these]
- USB exteantion cable (PWB) - 1 [we have these]
- 5 pin headers - TBD
- 1000uf 50V capacitor - 1 ***Eric
- 52ohm resistor - 1 ***Eric
- 3pin connector for end of LEDs to perf board - 1
- PSOC board for lights
- laptop power supply
- velcro [we have this]
Completed
- Select High-level Concept, work details in the concepts to help make the selection. [NES]
- Find out (in general) does the laptop and necessary parts (2 extra little boards (for buttons and something else), power supply, broken switches, and controllers.) fit in the controls box (not exact).[Yes, Xbox controllers can fit on top of the laptop]
- Make sure the control box fits in the driver station (measurement requirements found in game manual).
- Figure out where the NES opens up so that the laptop screen can be seen.
- Go through "controls"-related stuff in the shop and gather things we think we might want to use (buttons, switches, latches, etc.)
- Create a storage area for our stuff in the shop, we'll need a box or something to hold our parts.
- Talk to drive team and figure out what kind of control (Xbox, joysticks, etc.) they want this year. [Josh & Carol said to go with XBOX controllers]
- Brainstorm Ideas for Controls and record them.
- Figured out how the NES will open [To the left]
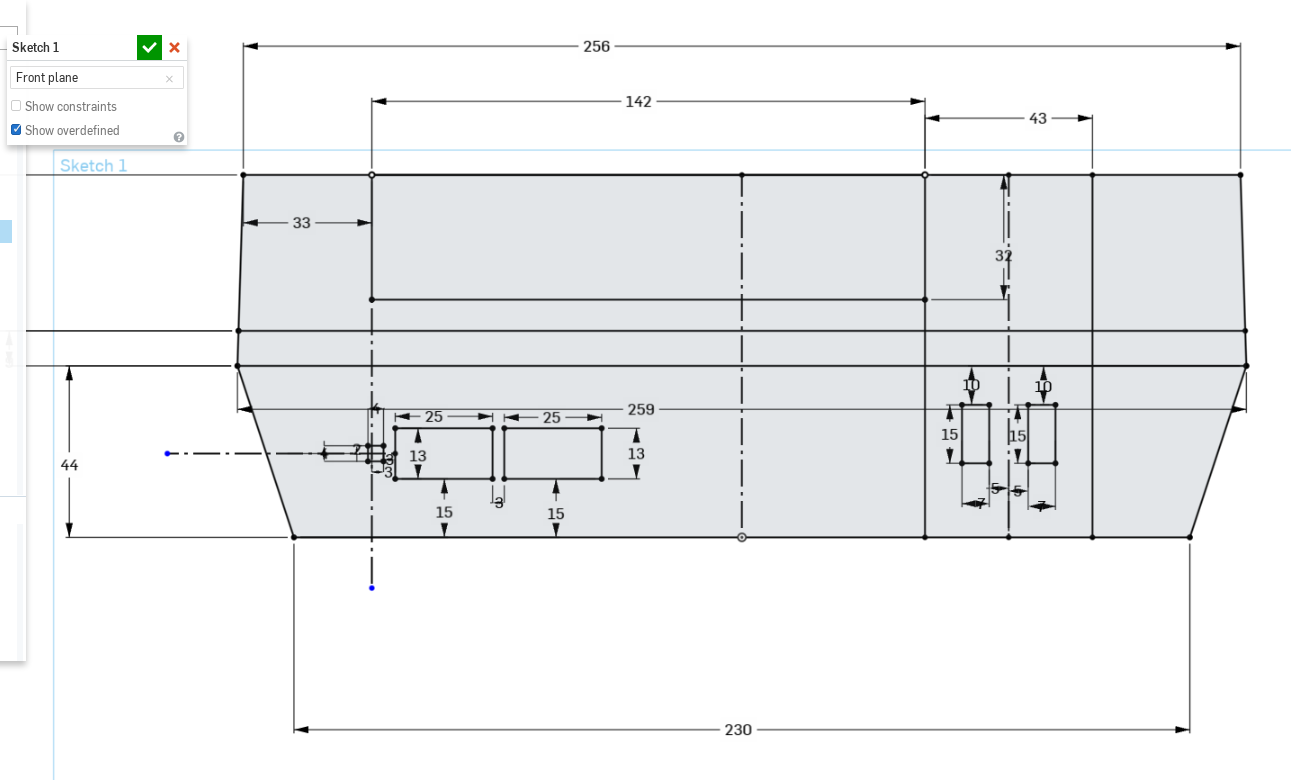
- CAD'd the NES
- Figured out the control box can fit the necessary parts such as the laptop and the broken switches.
- Found out that the control box fits the driver station requirements. (14in = 14in)
- Add the cutout for the LED next to the buttons.
- We changed the dimensions to 13.5
- Finished the labtop tray.
- Finished USB cutouts.
- Need to come up with a latch to keep controls closed.(https://goo.gl/v4L3BD) or magnets or (https://goo.gl/WQCsbg) or briefcase sytle when you push one of the buttons on the fornt the case is unlocked [suggest waiting until top and bottom mating surfaces are figured out]
- Ether port decided: Put on side where A/V plugs are.
- Find ether port part including datasheet; add cut-out
- Power cord decided: Put plug on side, where A/V plugs are (so not sticking out back and preventing controls from being tight against driver station wall). Roll up cord and put in the controls, maybe a clip to hold cord on outside of controls for quicker connection at start of match.
- Find power port part including datasheet; add cut-out
- Hinge decided: piano hinge for both lid and cartridge door
- Find and put on shoping list
- Finalize model (holes and studs for hinges, latches, USB ports, ether port, power port, PCBs, power led)
- Cut out fors: vents, lettering
- Create drawings for Harris
- Add detail into the metalwork and generate fab files.
- Top
- Add holes for paino hinge for door and clamshell
- Add holes for latch
- Bottom
- Resize to match the top.
- Fix bends, they almost look ok but it seems like there is a little too much relief in the corners.
- Add "lip" on top.
- Add power cord input
- Add RJ45 jack
- Add holes for laptop mount
- Add USB jack cutouts
- Laptop Mount
- Door
- Pretty much finished, lip is finally done, made room for piano hinge and decided how it will open, see Adrian/Tristan for details on hinge
- Top
- Add in a handle design (overall thought is handle on the back), need to add detail.(Handles on both sides or no handles or these on the bottom https://goo.gl/FNXMqh / https://goo.gl/Q3MRnj) [might be too heavy for no handles; doesn't appear there are 'natural' handles; handle on back might be awkward for placing them on the driver station shelf]
Useful Links
- Subteam Student/Mentor Photos
- Zero Delay USB Joystick Encoder
- http://exposantana.com/img/nes-measurements.jpg
- https://ibin.co/2pzZhDM2hmF8.png
- https://grabcad.com/library/nintendo-entertainment-system
- http://www.jetpress.com/Products.aspx/bwejaatthl/30Series-SpringClawLatch/
Meeting Minutes
1/10
Attendees: Zach, Kyle, Jameson, Parker, Eric, Byers
Work Completed: Brainstormed ideas for control sets.
1/11
Attendees: Kyle
Work Completed: An attempt was made, but overall nothing got done.
1/13
Attendees: Zach, Kyle, Adrian
Work Completed: CAD'd the NES to the dimensions above. Began gathering materials. Allocated shelf space in shop closet.
1/14
Attendees: Kyle and Aidan
Work Completed: Figured out the control box can fit the necessary parts such as the laptop and the broken switches; Found out the control box fits the driver station requirements (14in = 14in); began the final NES CAD
1/16
Attendees: Eric, Parker, Aidan, Adrian, Jameson
Work Completed: Researched some handle ideas, added button cutouts and started to add USB ports to base, found a nintendo font, decided which way the controls should open (to the left), determined that we should be able to store the joysticks either on the laptop or in the top half of the chassis.
1/17
Attendees: Zach, Byers
Work Completed: Look at lots of possibilities for handle, hindges and latchs. Made sure things would fit in controls, working towards final details of the holes.
1/18
Attendees: Aidan, Byers
Work Completed: Made descisions on hinges, power chord, started labtop tray drawing.
1/20
Attendees: Aidan, Jameson
Work Completed: Finished USB ports and re-drew labtop tray.
1/21
Attendees:
Work Completed:
1/23
Attendees: Aidan, Adrian, Jameson, Kyle, Eric, Parker,
Work Completed: Polished up CAD, looked at latch possibilities, added a few things to the shopping list.
1/24
Attendees: Adrian, Byers
Work Completed: Worked on "lip" for NES, worked on corners.
1/25
Attendees: Aidan, Adrian, Tristan, Zach
Work Completed: Corners fixed, door pretty much completed with gaps and decided how piano hinge will fit and work, buttons looked at, some small things fixed1/27
Attendees: Adrian, Tristan, Aidan, Jameson, Eric, Byers
Work Completed: CAD, CAD drawings, put drawings in the file
1/28
Attendees: Jameson, Parker, Byers
Work Completed: Basic supply list
1/30
Attendees: Eric, Jameson, Parker, Aidan, Adrian
Work Completed: Eric fixed the laptop tray drawing. Everyone else was helping to generate drawings for the robot.
1/31
Attendees: Adrian, Zach, Tristan, Byrers
Work Completed: Went down "to order" list; found practically everything, decieded on handle, started decal for door.
2/1
Attendees: Adrian, Aidan , Tristan, Byers
Work Completed: Worked on decal, Fonts are Nintender and NES2.
2/3
Attendees:
Work Completed:
2/4
Attendees:
Work Completed:
2/6
Attendees:
Work Completed:
2/7
Attendees:
Work Completed:
2/8
Attendees:
Work Completed:
2/9
Attendees:
Work Completed:
2/10
Attendees:
Work Completed:
2/11
Attendees:
Work Completed:
2/12
Attendees:
Work Completed:
2/13
2/14
Attendees:
Work Completed:
2/15
Attendees:
Work Completed:
2/16
Attendees:
Work Completed:
2/17
Attendees:
Work Completed:
2/18
Attendees:
Work Completed:
2/19
Attendees:
Work Completed:
2/20
Attendees:
Work Completed:
Controls Rules
8.10 OPERATOR CONSOLE
R97. The Driver Station software provided on the National Instruments website is the only application permitted to specify and communicate the operating mode (i.e. Autonomous/Teleoperated) and operating state (Enable/Disable) to the ROBOT. The Driver Station software must be revision 18.0 or newer. Teams are permitted to use a portable computing device of their choice (laptop computer, tablet, etc.) to host the DRIVER Station software while participating in competition MATCHES.
R98. The OPERATOR CONSOLE, the set of COMPONENTS and MECHANISMS used by the DRIVERS and/or HUMAN PLAYER to relay commands to the ROBOT, must include a graphic display to present the Driver Station diagnostic information. It must be positioned within the OPERATOR CONSOLE so that the screen display can be clearly seen during Inspection and in a MATCH.
R99. Devices hosting the Driver Station software must only interface with the Field Management System (FMS) via the Ethernet cable provided at the PLAYER STATION (e.g. not through a switch). Teams may connect the FMS Ethernet cable to their Driver Station device directly via an Ethernet pigtail, or with a single-port Ethernet converter (e.g. docking station, USB-Ethernet converter, Thunderbolt-Ethernet converter, etc.). The Ethernet port on the OPERATOR CONSOLE must be easily and quickly accessible. Teams are strongly encouraged to use pigtails on the Ethernet port used to connect to the FMS. Such pigtails will reduce wear and tear on the device’s port and, with proper strain relief employed, will protect the port from accidental damage.
R100. The OPERATOR CONSOLE must not Section 8 ROBOT Rules V2 96 of 127 A. be longer than 60 in. (~152 cm) B. be deeper than 14 in. (~35 cm) (excluding any items that are held or worn by the DRIVERS during the MATCH) C. extend more than 6 ft. 6 in. (~198 cm) above the floor D. attach to the FIELD (except as permitted by G19) There is a 54 in. (~137 cm) long by 2 in. (nominal) wide strip of hookand-loop tape (“loop” side) along the center of the PLAYER STATION support shelf that should be used to secure the OPERATOR CONSOLE to the shelf, per G19. See Section 3.6.1 PLAYER STATION for details. Please note that while there is no hard weight limit, OPERATOR CONSOLES that weigh more than 30 lbs. (~13 kg.) will invite extra scrutiny as they are likely to present unsafe circumstances.
R101. Other than the system provided by the ARCADE, no other form of wireless communications shall be used to communicate to, from, or within the OPERATOR CONSOLE. Examples of prohibited wireless systems include, but are not limited to, active wireless network cards and Bluetooth devices. For the case of the FIRST Robotics Competition, a motion sensing input device (e.g. Microsoft Kinect) is not considered wireless communication and is allowed.
R102. OPERATOR CONSOLES shall not be made using hazardous materials, be unsafe, cause an unsafe condition, or interfere with other DRIVE TEAMS or the operation of other ROBOTS.